Furality Ultra Club A/V Writeup
Hi I'm Value. I'm one of the producers on the Furality A/V Team and I want to yap about A/V production leading up to Furality Ultra. This is not an official Furality writeup and does not represent any views or future plans Furality has. This is just me yapping and sharing the stuff I touched on and learned during the A/V production cycle this year.
This year I worked on producing sets, creating tooling, creating workflows, helping out put out fires and organize work.
I was not the one working on the world, that'd be Micca (and a lot of the other folks from the creative team). So anything relating to the club world might not be 100% accurate.
Terminology
- "CRVF" - Club ready video file - the thing we play out that contains the DJ introduction, DJ set, visuals, lights, countdown etc.
Stage Tech
This year we streamed into the world at 2560x1440 30fps H.264 8Mbps via RTSP. VRCDN handled the broadcast delivery. All the club programming came in through this video broadcast. So everything you saw happen was being controlled by this video.
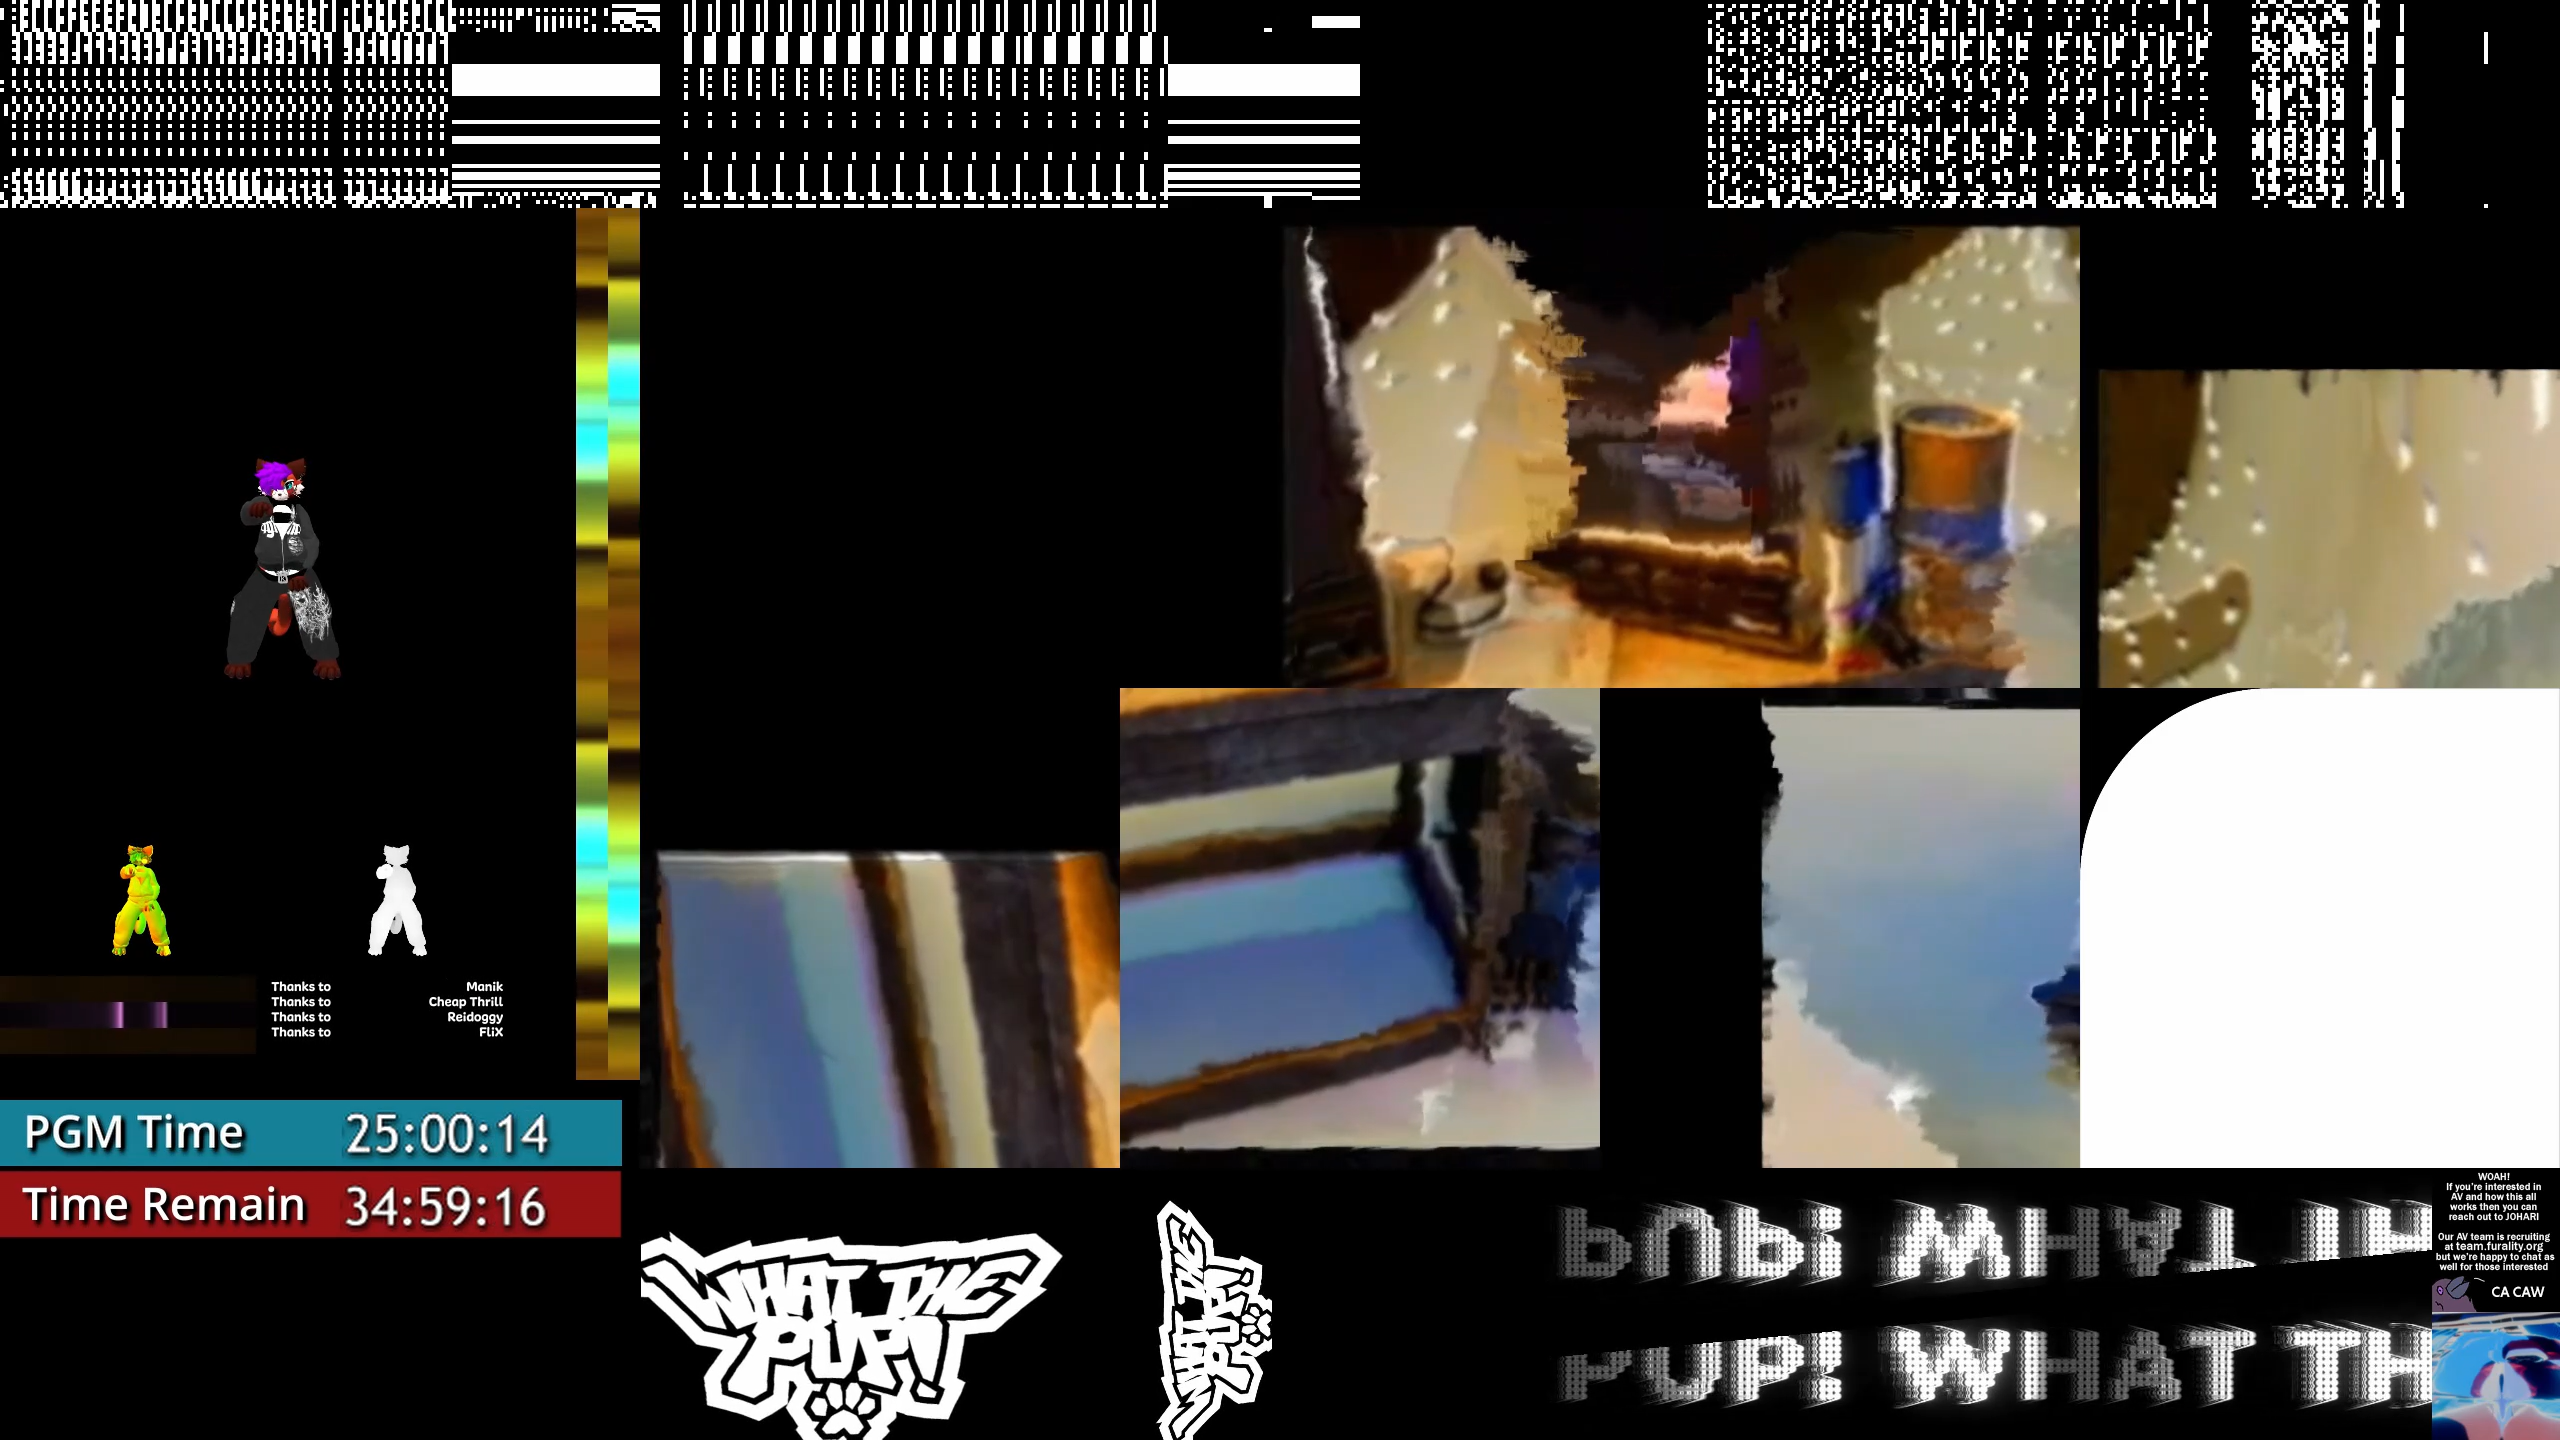
This video is split up into various 'slices' that we can put content into.
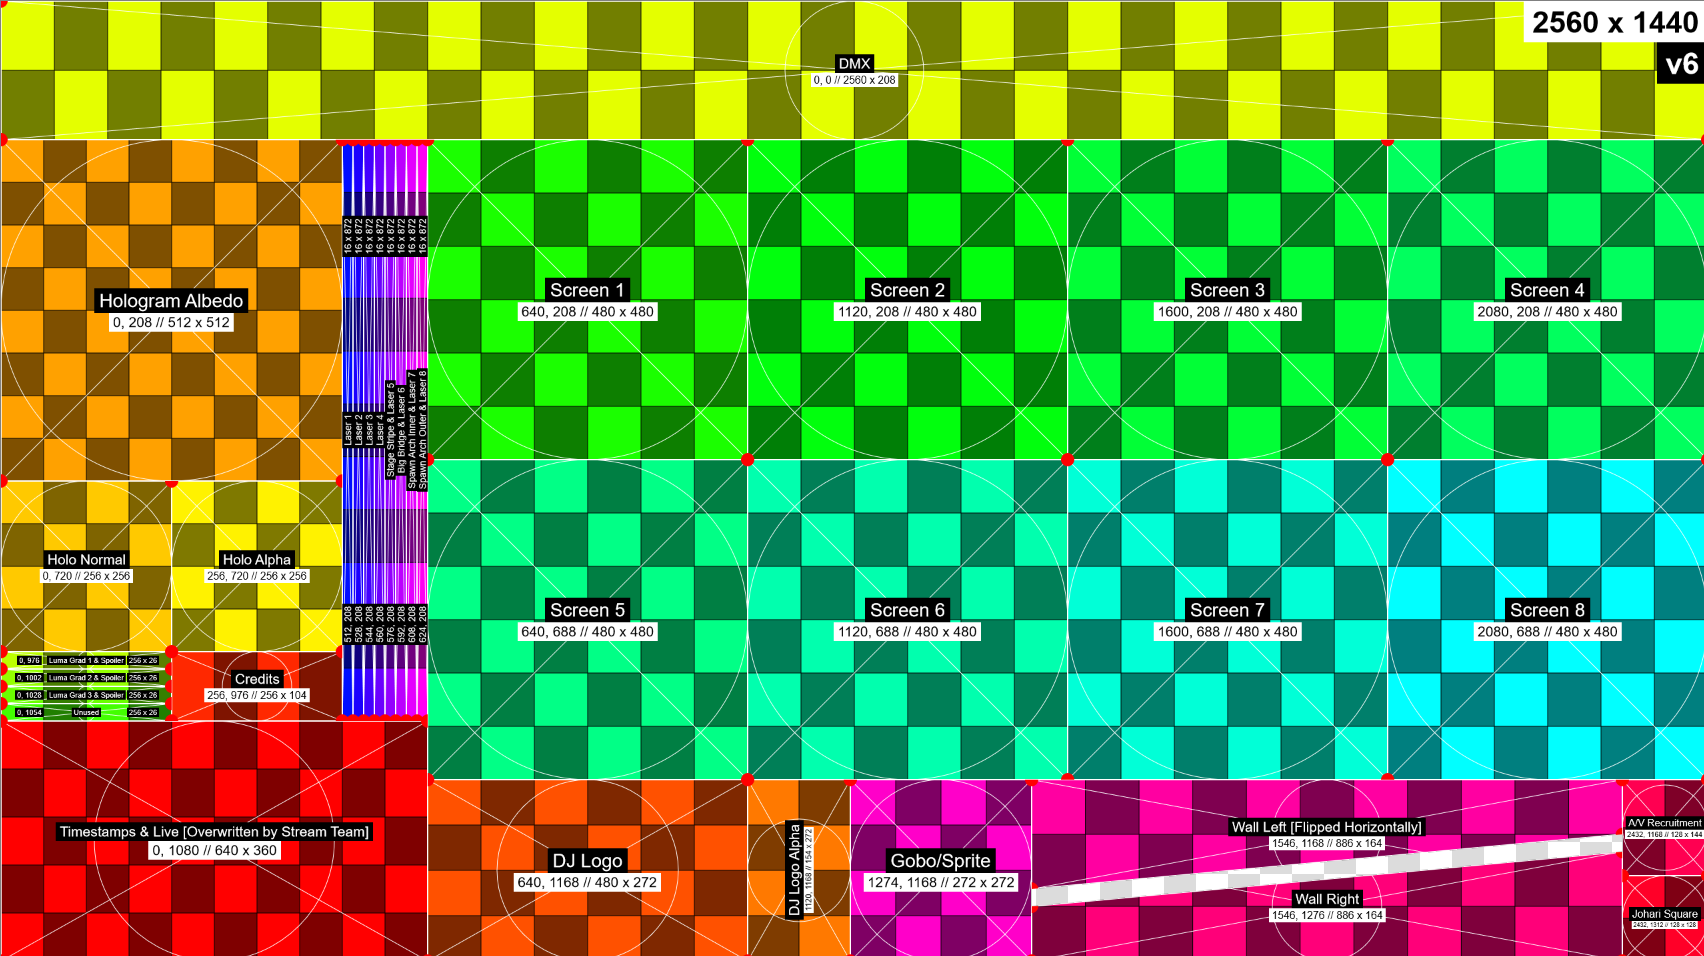
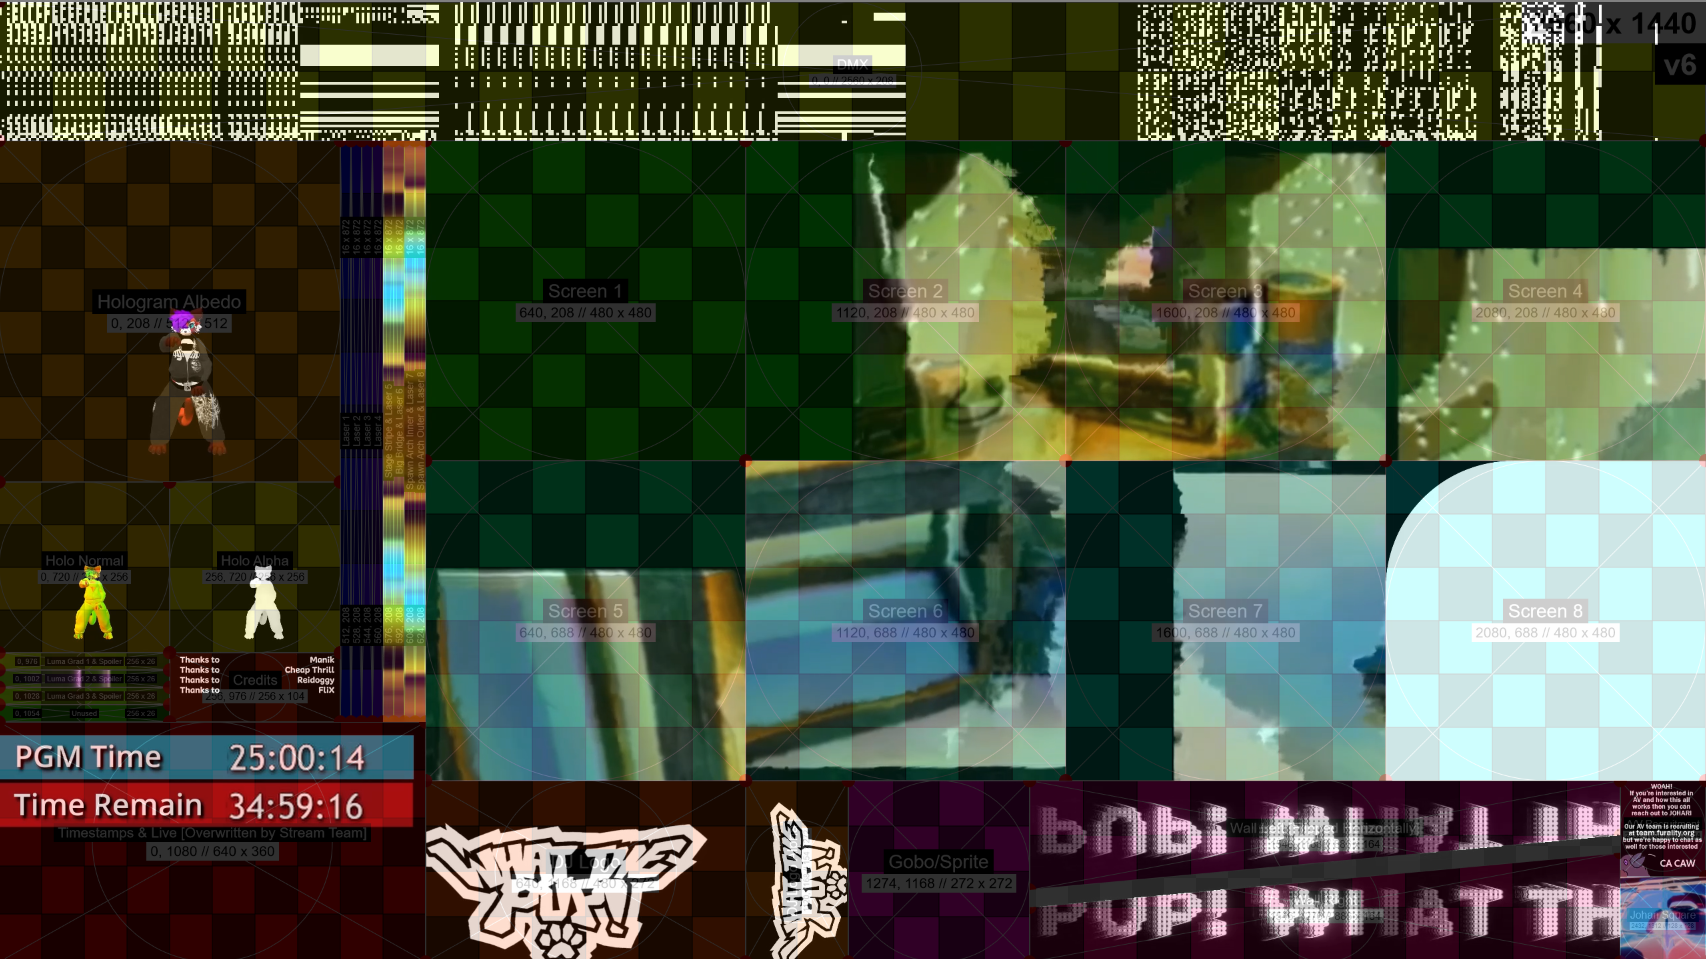
The world cuts the video up into these slices and uses the slices around the various elements such as screens, hologram, DJ booth etc.
The "DMX" slice at the top contains DMX data encoded as binary using the MDMX system. Each white/black square is a 4x4 region of pixels that encode a single bit. Black regions are 0s and white regions are 1s. Each column contains 6 bytes of data with a 4 bit CRC for error checking at the end. So each column is 6*8+4=52 bits.
More information about MDMX can be found in the Stage Flight patch and Micca's MDMX repo
We use Furality Gridnode to take in DMX from professional lighting software like grandMA3, MagicQ, QLC to Blender and other DMX outputting software. Fgrid then takes that DMX in and creates the binary gridnode that we can broadcast into the world.
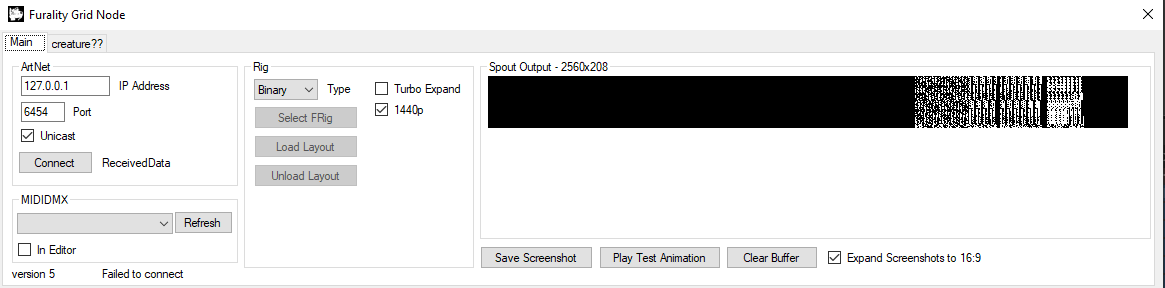
Fgrid outputs this binary gridnode over Spout, so we can capture it in OBS and record it. We can also take screenshots of it.
World Features
This year the world had:
- 8 screens with 6 DoF and 2 axis scale.
- A particle screen with 6 DoF and scale.
- A particle system
- 36 spot lights with pre-baked volumetric lights ("lutbeams") attached to light robots with 3 DoF
- 82 parcans throughout the world
- 20 2D lasers attached to FX robots with 6 DoF
- Jill 😳 (the big creature)
- Backdrops with multiple planets to choose from and an in-between warp mode.
- Fireworks on the FX robots.
Screens
The screens were fun. Each screen was able to be moved and rotated [-50;50] cube and scaled between [0;5.8] units. Each screen could take from one of the 8 screen slices in the video map. Each screen could also choose which other screen acts as the mask for that screen, allowing us to do more complex shapes than just squares.
DMX Programming
Apart from the visual content, the rest of the world was programmed using DMX and streamed into the world via binary MDMX. We use a patch sheet to understand the capabilities of the club and to know what exactly to program. Here's the patch for Stage Flight as an example. The patch outlines where the individual fixtures are located and their capabilities. We can then patch these into our DMX software and control the world.
For quick programming and preview of the DMX programming, we use MIDIDMX. It encodes DMX as MIDI and sends that into the VRChat client. The world reads this MIDI and lets us control the world with minimal latency.
Blender
Given the 6 DoF and scale controls for pretty much the whole club, we needed some way to control it all. We ended up using Blender and the DMX plugin by Happyrobot.
I ended up patching in the rig into a blender file, creating instructions for setting it up and sharing it with the rest of the team.
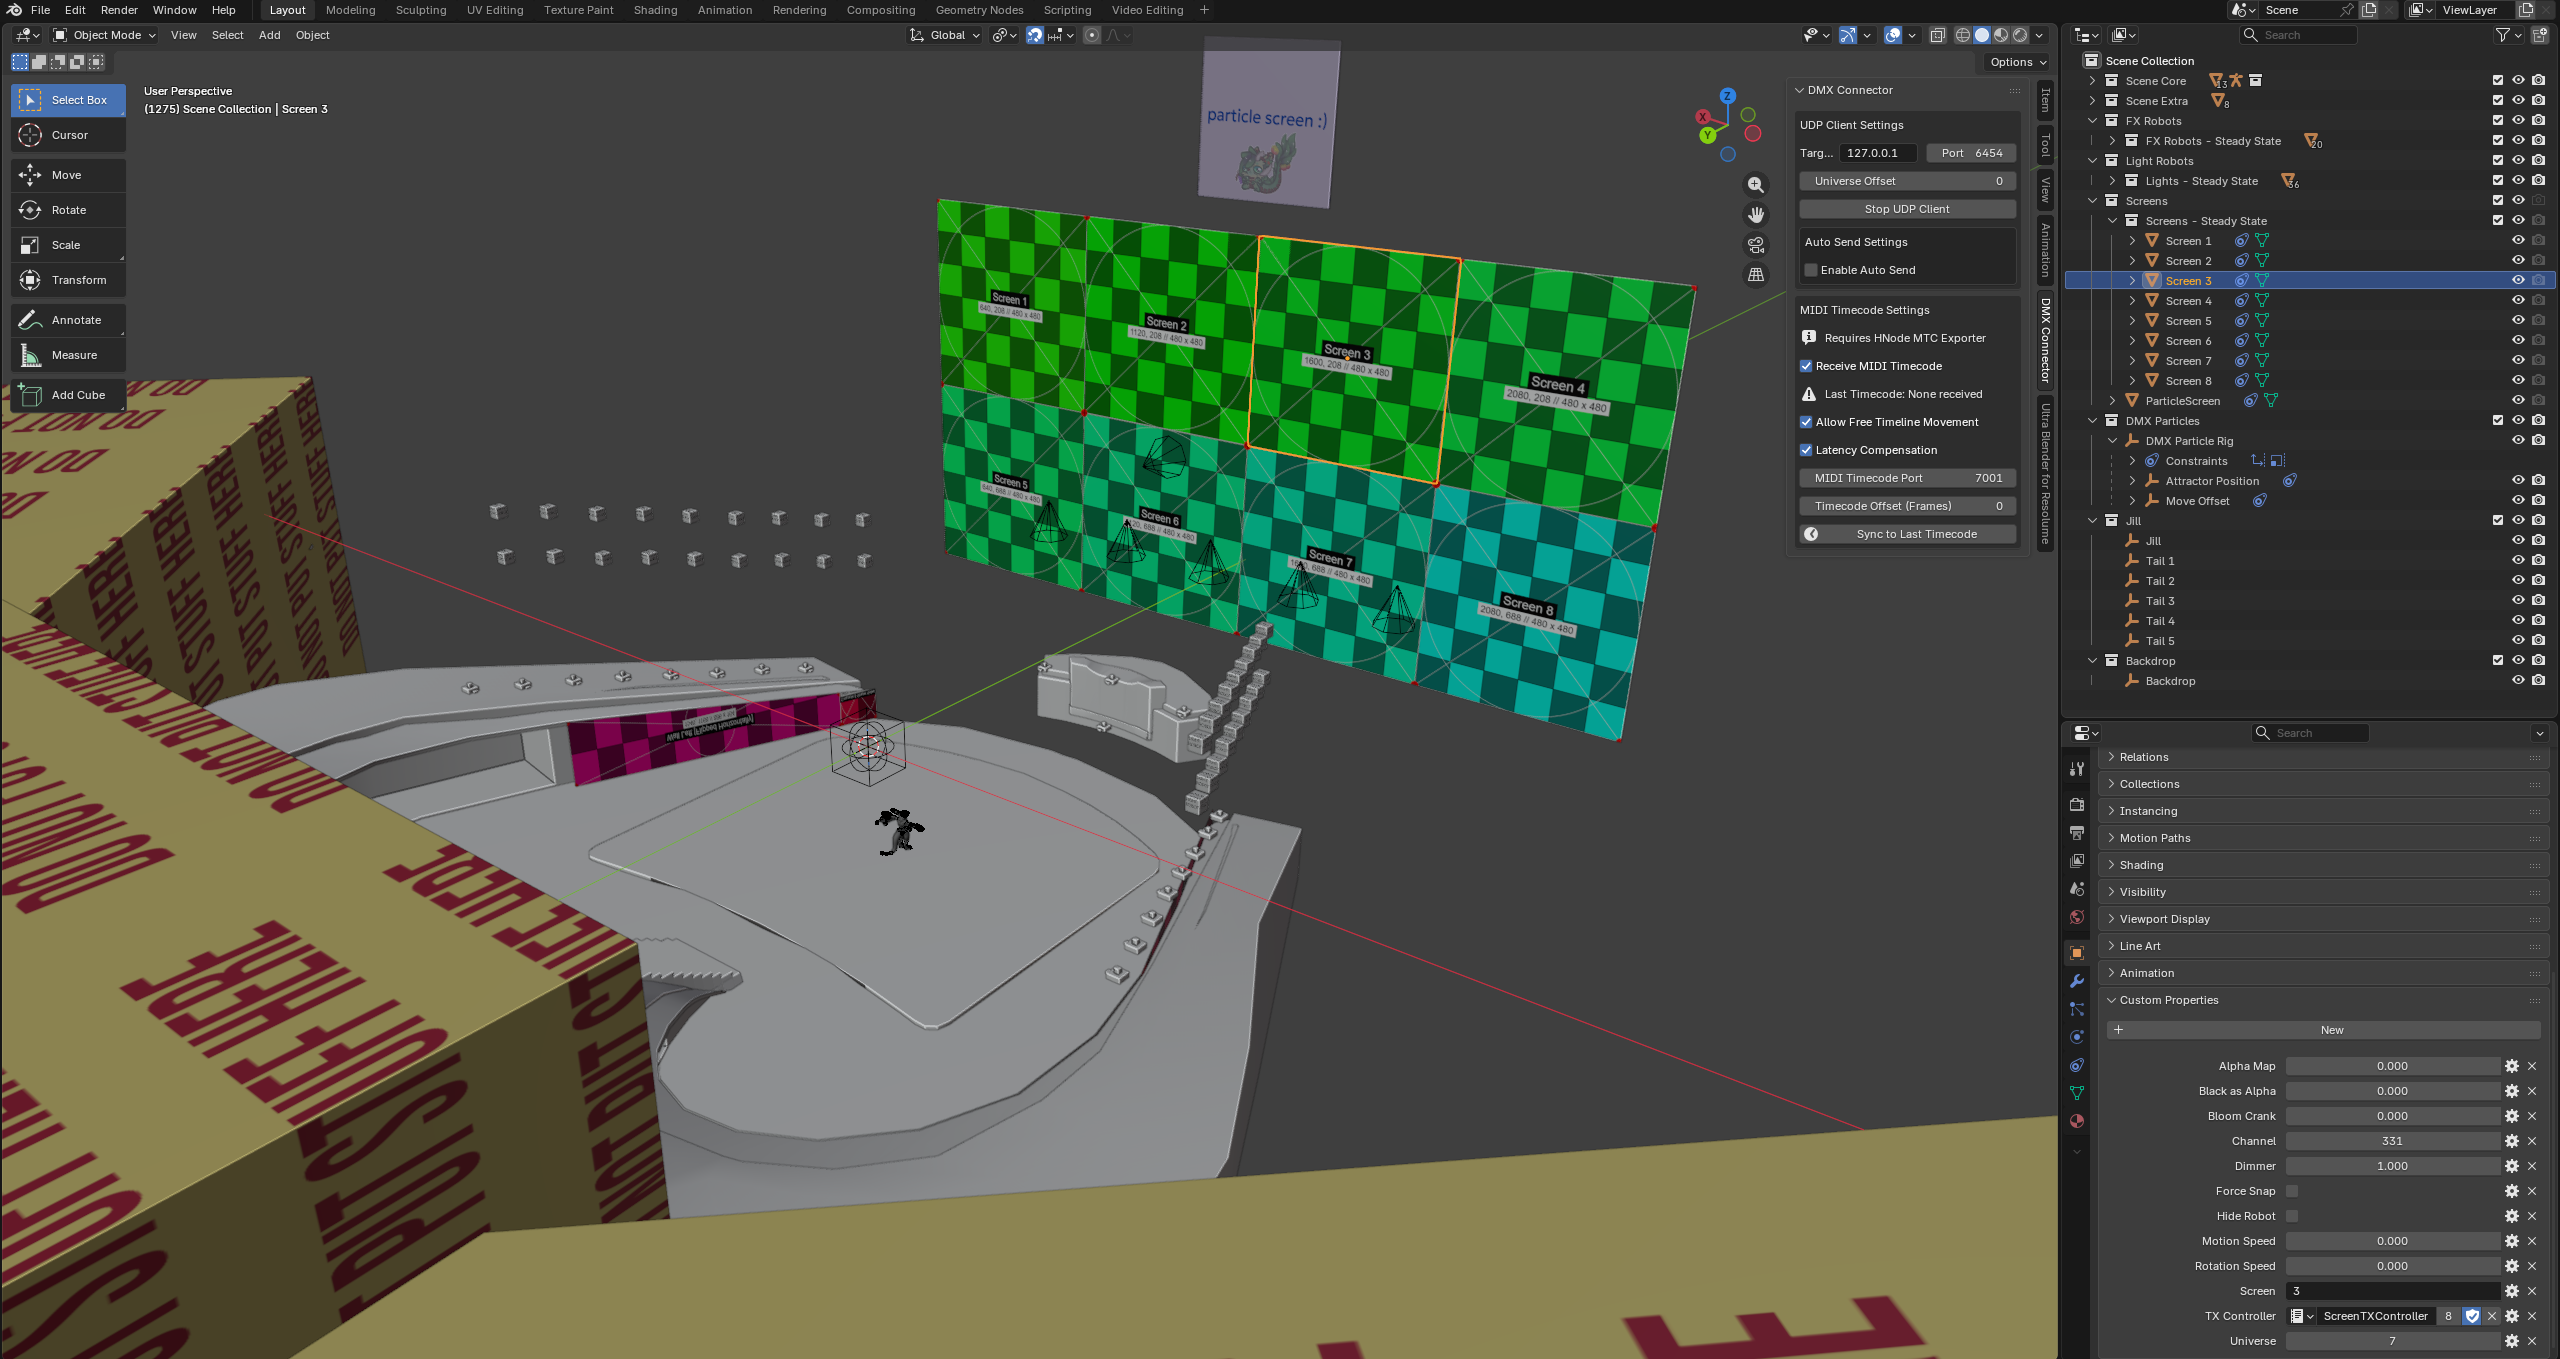
Each object represents a fixture and we have custom properties on these objects that control the channels of that fixture. For more complex channels like XYZ position, XYZ euler and scale, we use a text block property which runs a script that encodes the object transform into DMX.
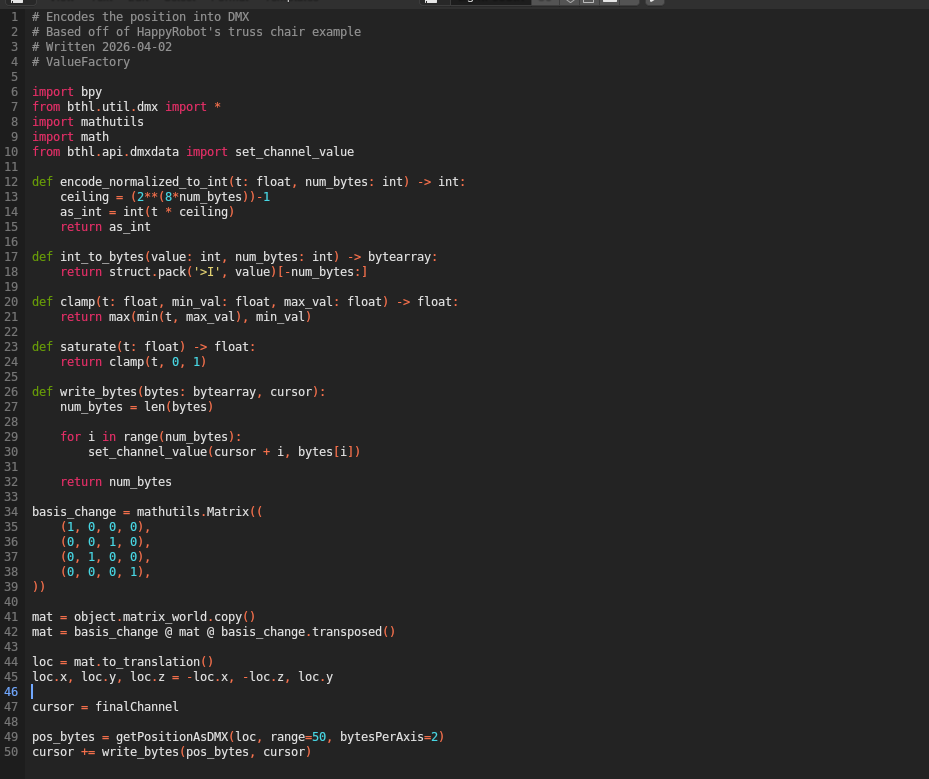
So in the end we have the ability to control the screens and other things from blender!
This is how many collections I ended up having in my working blend file.
The workflow I ended up using is to separate each scene into its own collection, create linked duplicates of the reference fixtures that I needed for that scene and put them into the collection.
And because Blender has a whole animation tooling suite, we can do some fun and non-trivial things!
Setup Guide
You can find the guide I wrote for how to set this blender tooling up (without the .blend file, sorry!) here
Constraints
We can make objects track other objects. For example this was used in Daxan's Jill UFO fight. Jill and the UFO both had FX drones with lasers that tracked each other. I had set up small rigs for the UFO to easily animate things as well so that the UFO can move and the FX drones on the UFO and the particle screen moves in unison with the root UFO object.
The tracking was done using 'Track-to' constraints on the individual objects and I had them target a tracking object.

Drivers
Drivers let us create relationships between individual channels on fixtures. For example I ended up using it to create a simple Jill tail rig:
Tail 1 controls the tail fold and tail width for the other 4 tails.
Tail 5 wag is 1 - Tail 1 wag
Tail 4 wag is 1 - Tail 2 wag
So drivers let us patch in these relationships rather easily.
Animations
Blender lets us keyframe stuff! So we can keyframe object transforms and custom properties!
Going back to the Daxan Jill vs UFO fight, that whole thing was done using animations. I ended up exporting out the audio for that part, putting it into the video editor timeline of Blender so that I have some music to timecode to, and then keyframed the action across a few scenes.
Here's the scene where Jill toys around with the UFO. Unmute the clip to hear the audio.
Keep in mind this is just the DMX programming, so we're not seeing any of the visuals and the UFO. Putting in that visual content is done later in Davinci Resolve.
Video Playback
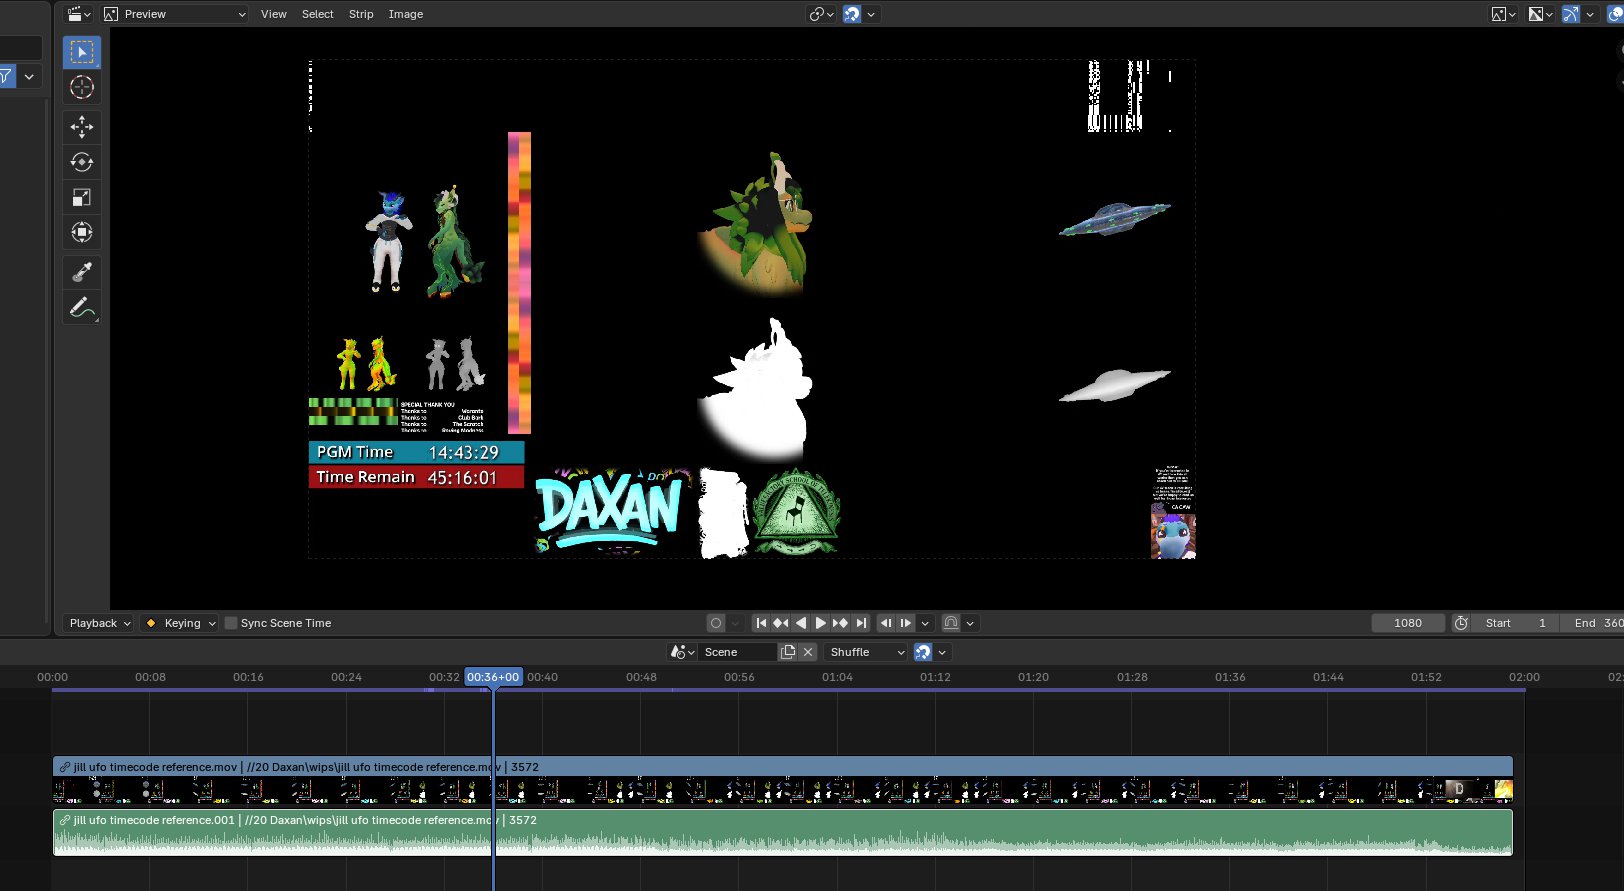
So while I didn't dare do video editing in Blender (it doesn't quite suit my needs), the video playback capabilities in Blender were VERY useful to be able to accurately timecode scenes. I mentioned above how I used the audio to timecode the Jill UFO fight, but we can also do the same with video.
For example I keyframed the intro animation using a reference video as a texture source and the audio in the video timeline. Each screen was properly UV unwrapped to sample from the incoming video broadcast the same way it would in the world, so all I had to do was make a new material, drag the intro video (produced by nullreff) into that material as a texture input, set up that node and assign that material to the screen objects. The audio was sourced separately by dragging in the video into the video editing tab and removing the video clip but keeping the audio.
Unmute the clip for audio.
So the result is that we have audio and video to keyframe to!
Limitations
During the DMX recording of the club intro, I noticed that some of the frames were being dropped and that the captured DMX stuttered every now and then. Nullreff suggested we work around this by recording at 0.5x speed and speed it up 2x in Davinci. It worked out in the end but I don't think that will work for us in the future.
The exact cause of the stutter is unknown but I noticed that the more complex the scene, the more likely it will stutter. The intro had a bunch of objects and object transitions and it's likely Blender and it's python API couldn't keep up. Moving into the future I think setting up an "offline" render pipeline for the DMX data out of blender would help us avoid this issue.
Some Thoughts
I think we're barely scratching the surface of how Blender can help us in the VR A/V scene. I've been wondering what the strengths of VR shows are for a while and I've been very lucky to be able to work with talented people at Furality and Stage Flight to explore that. This 6 DoF + Blender stuff feels like that special sauce that makes VR shows unique. Nothing else can quite match the spectacle of seeing MeowMix or Daxan and the stage movements in those sets were only possible due to Blender's tooling.
VRSL's grayscale 16x16 blocks suffer from psycho-visual tuning that video encoders perform and MDMX is the solution to that data loss over this analog medium. The binary gridnode was one of the tech cornerstones of being able to properly transmit the programming we do in Blender and it would not have been possible without it. I was not the one working on MDMX, all the credit would have to go to Micca and Torvid (and maybe more people I'm forgetting, sorry!).
While all this Blender tooling is available right now for ya'll to mess with, I really hope we can put out MDMX for everyone to enjoy the benefits of!
Davinci Resolve Tooling
A significant amount of time was spent doing composition or content programming in Davinci during Somna and Stage Flight. So investing time into making better tools for us there was a no-brainer.
MDMX Fixture
I've been throwing around the idea of making DMX control software for myself but I'm lazy and want to do the least amount of work I can. So I ended up writing a Davinci Resolve plugin that can load fixtures and create keyframable parameters in the davinci timeline for me to program.
While we can control DMX in programs like Blender, QLC, grandMA3 etc, we have no way of directly programming DMX in Davinci Resolve and this plugin lets us do that. The plugin loads fixtures in a json format and exposes parameters for you to control then writes the values of those parameters directly into the video as a MDMX binary gridnode.
MDMX Fixture is open source and can be found here
For example this is the screen fixture definition I used for the screens:
F9 Screen V2.json
{
  "id" : "F9 Screen v2",

  "default_dmx_universe": 7,
  "default_dmx_channel": 283,

  "num_fixtures_in_sequence": 8,

  "controls": [
    {
      "name": "Position",
      "type": "pos_xyz_16",

      "x_channel": 1,
      "x_fine_channel": 2,

      "y_channel": 3,
      "y_fine_channel": 4,

      "z_channel": 5,
      "z_fine_channel": 6,

      "display_min": -50,
      "display_max": 50
    },

    {
      "name": "Rotation",
      "type": "euler_xyz_16",

      "display_min": -270,
      "display_max": 270,

      "x_channel": 7,
      "x_fine_channel": 8,

      "y_channel": 9,
      "y_fine_channel": 10,

      "z_channel": 11,
      "z_fine_channel": 12
    },

    {
      "name": "Size X",
      "type": "float_16",
      "channel": 13,
      "channel_fine": 14,

      "default_value": 0.7,
      "display_min": 0,
      "display_max": 5.6
    },

    {
      "name": "Size Y",
      "type": "float_16",
      "channel": 15,
      "channel_fine": 16,

      "default_value": 0.7,
      "display_min": 0,
      "display_max": 5.6
    },

    {
      "name": "Dimmer",
      "type": "float",
      "channel": 17,
      "default_value": 1
    },

    { "name": "Black as Alpha", "type": "float", "channel": 18 },
    { "name": "Bloom", "type": "float", "channel": 19 },

    {
      "name": "Alpha Mask",
      "type": "integer",
      "channel": 20,
      "display_min": 0,
      "display_max": 8
    },
    { "name": "Hide Robot", "type": "toggle", "channel": 21 },
    { "name": "Motion Speed", "type": "float", "channel": 22 },
    { "name": "Rotation Speed", "type": "float", "channel": 23 },
    { "name": "Force Snap", "type": "toggle", "channel": 24 }
  ]
}
Once we load it in the plugin, we have access to these parameters:
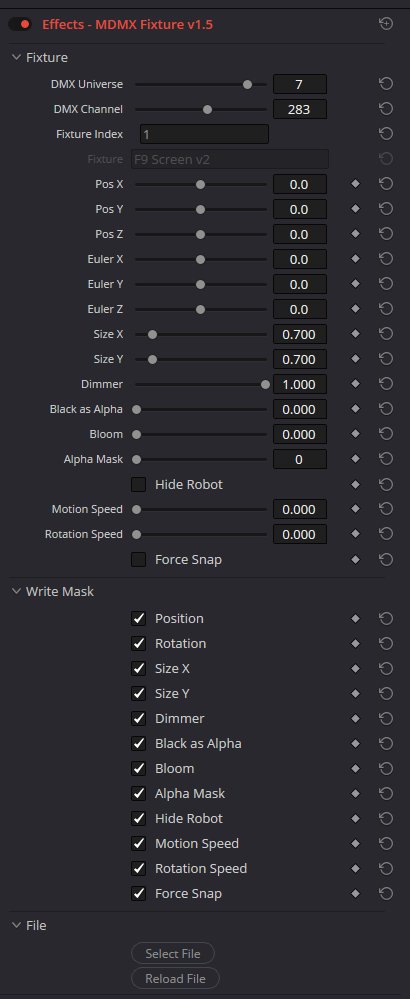
So each of the fixture parameters can be keyframed in the Davinci timeline editor.
The "Write Mask" lets me choose which parameters are generated. If a parameter has the write mask unchecked, the MDMX pixels associated with that will not be emitted and will not overwrite anything previously there. So this also lets us poke values into the middle of fixtures that have been otherwise programmed earlier.
One caveat is that MDMX Fixture plugin does not calculate the CRC of the MDMX columns it outputs to. That's the next step.
MDMX CRC
The MDMX gridnode is broken down into individual columns of 6 bytes. Each column has 4 bits at the end that contain the CRC of those 6 bytes. The 4 bits are there for a few bits of error checking, which considering we're transmitting this binary over what's effectively an analog medium, is very useful. If we catch errors, we can use the last known correct value.
But the existence of this CRC poses a problem: we can't easily poke values into the middle of a MDMX column. If we change any of the bytes in a column, the CRC needs to be recalculated.
On top of that, the MDMX Fixture plugin for Davinci doesn't calculate the CRC in the first place. So to be able to poke values and to use MDMX fixture plugin, we needed a way to be able to recalculate the CRC in a video editor.
I ended up writing the MDMX CRC Recalc davinci plugin to support this workflow. You can put it on an adjustment clip and set the resolution of the binary gridnode and it will take all the MDMX gridnode underneath the adjustment clip and recalculate the CRC for it.
MDMX CRC Recalc is open source and can be found here
It came in VERY useful. In fact we ended up using it during the final composite for the firework show to turn off some firework emitters as they were causing the video sound to crash. MDMX CRC recalc let us poke 0's into the firework fire channel without corrupting the CRC.
VideoRemap
The way we slice up videos into the video mapping typically is done using Resolume Arena. However Resolume Arena is geared for a realtime workflow as it doesn't have a timeline or anything to help us precisely switch mapping and to record remapped content as fast as possible.
That was REALLY annoying during Somna so I made VideoRemap in-between Somna and Ultra. It's a Davinci Resolve plugin.
VideoRemap lets us define how to cut up an input video into different parts. We can define this mapping in Resolume Arena, then load it on an instance of VideoRemap on your video clip in the Davinci timeline and it will do that slicing for you. This means you can remap content "offline" and render it as fast as your machine allows instead of waiting for it to play out like before in Resolume.
For fun, here's the same video mapped onto the peacock feathers from Somna:
Without this tool I'm confident in saying that sets like Daxan and Birdbrain would not have been possible. There are hundreds of instances of this plugin active on those sets, mapping 16:9 content to various layouts of the screens. This tool was essential for me this year.
VideoRemap is available here for use in your own productions with are documentation here. You can use this tool on any VR club production (and maybe even outside of VR :O )
Spout Output
Davinci Resolve doesn't provide any kind of easy to use monitoring output such as Spout or NDI. I ended up writing a plugin to output video over Spout as a stop-gap.
Davinci Spout Sender is open source and can be found here
I use this thing in every production now. Slap it on an adjustment clip at the top of your timeline, receive it in OBS and flip. Then stream that out via VRCDN private or MediaMTX into world. The reason this is useful is so that I can preview the sequencing/programming I'm doing in Davinci. It removes the need for me to render out a clip into a video file as I can just play it out in world as it's playing out in my timeline. Ofc MediaMTX and VRCDN add their own latency, but maybe VRChat will add spout input support into the client at some point for us ;)
Luma Glow Generation
This year we needed a way to generate luma glow and world gradients for about 31 sets. I cooked up a TouchDesigner file to do that. So the majority of the luma glow (and world gradients) was generated from a TouchDesigner file in an audio reactive way.
The TouchDesigner file generated
- 4 Luma glow zone - (DMX out) - 3 band transient detection, 1 energy estimation.
- 3 Luma glow gradients - (Spout) - trailing luma glow zone data.
- 4 World gradients (Lasers 5,6,7,8) (Spout) - 1 energy estimation + low transient detection.
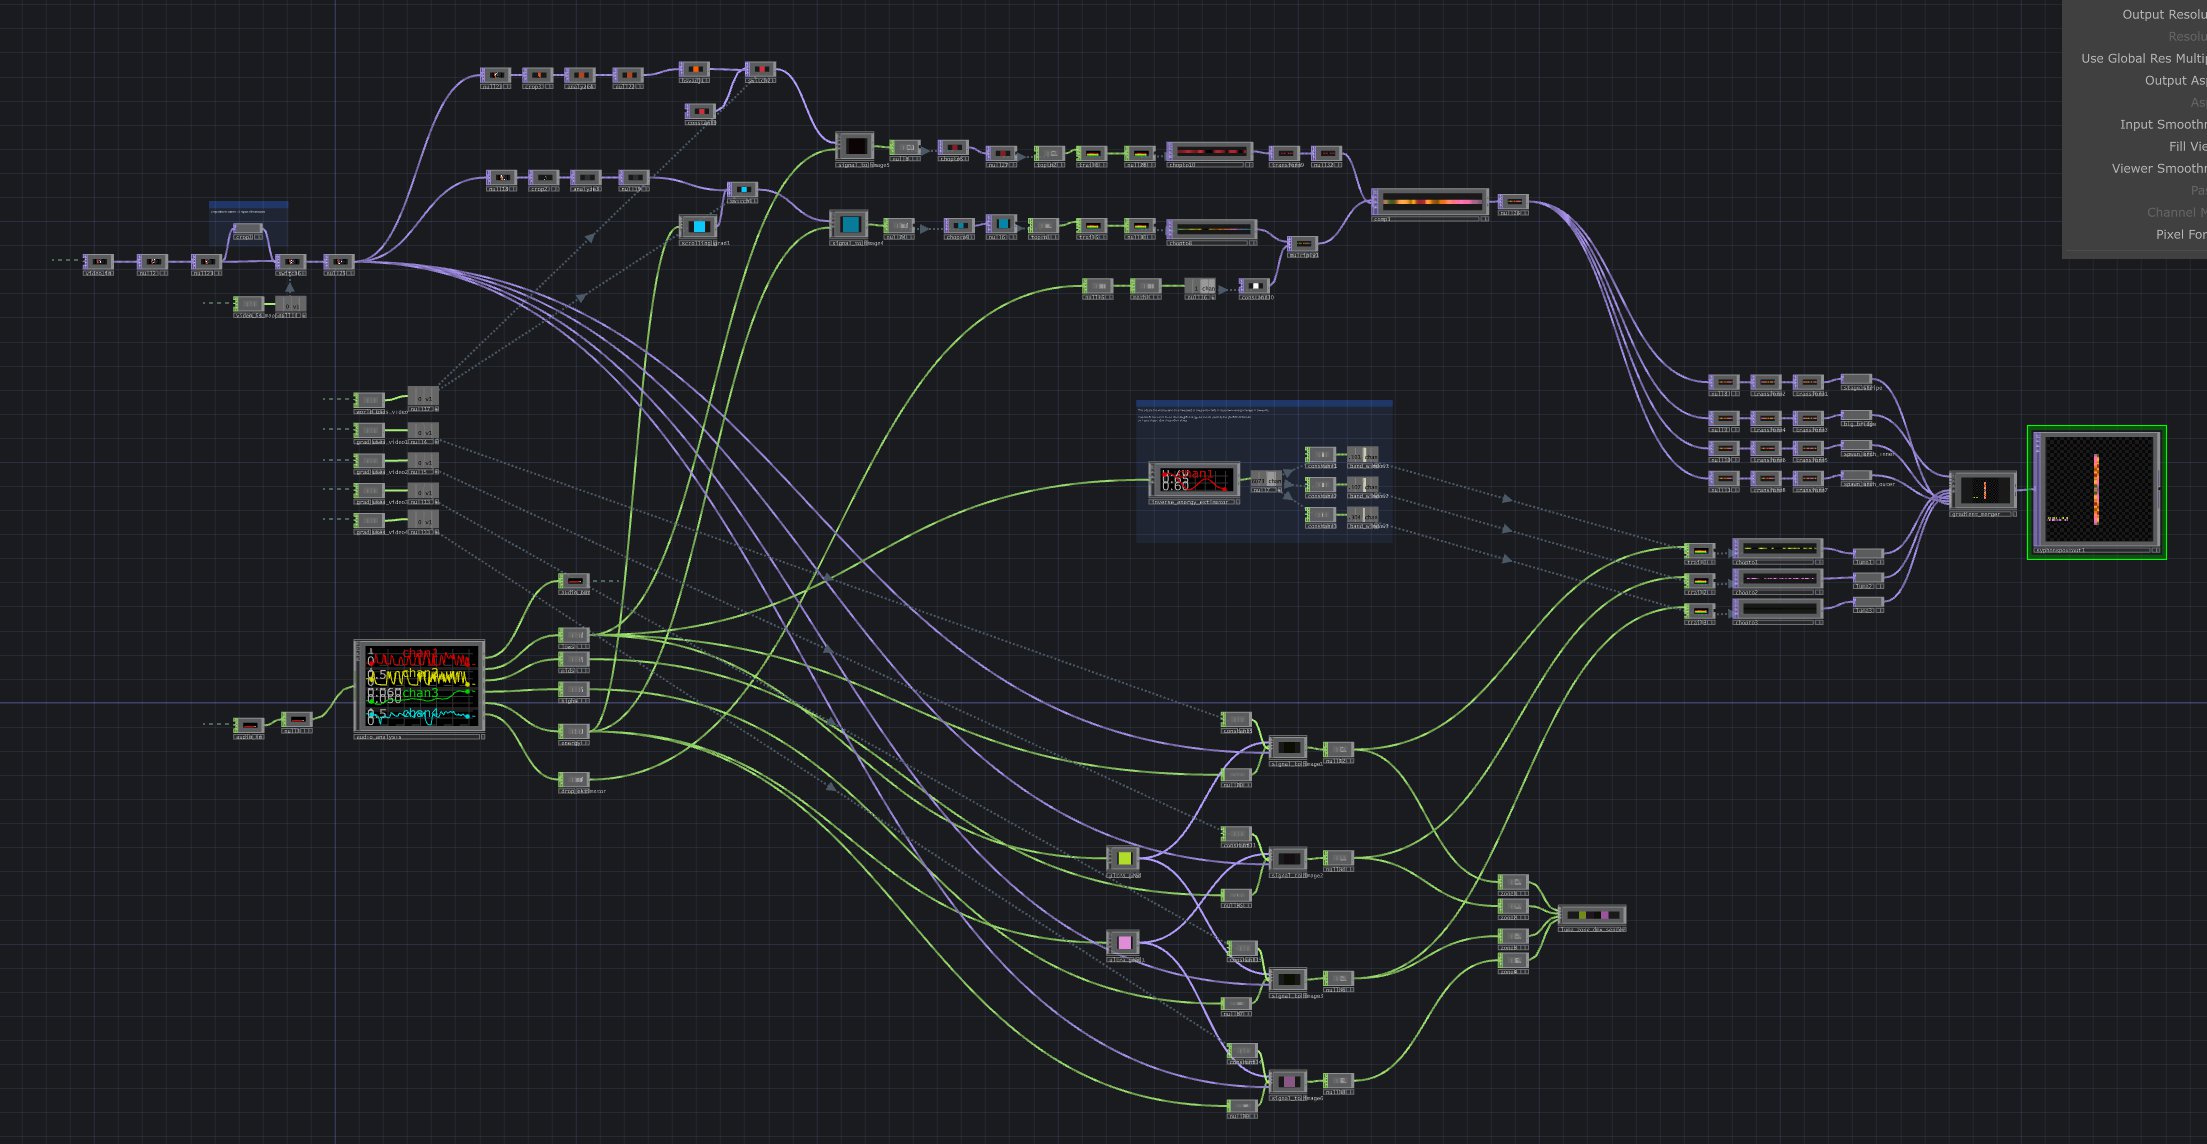
Transient detection was split into 3 bands: low, mid and highs. Lows were tuned for kicks, mids were tuned for snares and highs were tuned for hi-hats. Fundamentally the transient detection was done by generating a fast moving envelope and a slow moving envelope and then treating large deviations between the two envelopes as detected transients.Timing, filters and EQ for each of the bands was fine tuned.
The transient detection scrolls a gradient based off of the Ultra colors. For each luma zone, the color is sampled and multipled by a transient band and sent over DMX to Fgrid. Luma zones take that same data and trail it to generate a gradient image that's combined with the world gradient data. It's composited into the video map and gets sent out over Spout for capture in OBS.
World gradients were very similar. The energy estimator scrolls a gradient texture that's masked by that same energy estimator and the color is trailed to create a gradient. I also combined this gradient with a kick transient trail going in the opposite direction additively to give it a bit more energy. This gradient is then composited into lasers 5-8 and sent out over Spout.
Process
CRVF Export Settings
Before production kicked off, I helped standardize on V1 of the the video editor export settings used to deliver the CRVF files. Our editors use Premiere pro, Davinci Resolve Free and Davinci Resolve Studio. So we had to have settings for all of these platforms.
-
Premiere Pro
- Sequence settings
- Frame Size - 2560x1440
- Frame Rate - 30fps
- Export
- Format - QuickTime
- Video
- Video Codec - H.264
- Field Order - Progressive
- Aspect - Square Pixels (1.0)
- Use Maximum Render Quality - Yes
- Bitrate Encoding - CBR
- Target Bitrate - 16 Mbps
- Key frame every 1 frames - Yes
- Audio
- Match sample rate of original set audio. Default to 44100khz otherwise.
- 16 bit
- Sequence settings
-
Davinci Resolve
- Timeline Settings
- Resolution - 2560x1440 (1440p)
- Framerate - 30 fps
- Export
- Format - QuickTime (mov)
- Video
- Codec - H.264
- Encoder - Native
- Encoding Profile - high
- Preset - Quality
- Rate control - Constant Bitrate
- Bitrate - 16000 kbps
- Data levels - Full (changed to "video" later)
- Audio
- Codec - Linear PCM
- Sample Rate - Match original set audio. Default to 44100khz otherwise.
- Bit depth - 16
- Timeline Settings
We learned a few things afterward:
- Our video playout stack assumes limited (or "video") data levels. Premiere pro already exports in limited range but Davinci did not and so that was going to cause issues. We switched to a Davinci export preset that used
Data Levelsset to "video" to force davinci to export in "limited" data levels (yuv420p as opposed to yuvj420p) - The H.264 Native encoder used on Davinci Resolve windows is BAD: during cuts to black, the video it encoded decodes with errors in VLC and Playdeck. During high bitrate scenes, it creates intra-frame smearing and destroys our content. We trialed HEVC for sets exhibiting these problems and had no issues with HEVC renders.
If you're looking to use these settings as an example, I'd recommend using limited data levels and HEVC "Native" instead of H.264 for your final exports. Now you'll still be streaming H.264 out of OBS but that's fine if you use VideoLAN x264 as the encoder on OBS. That encoder did a really good job of preserving our content during encode.
CRVF Checklist
Last year I ended up producing a barebones text checklist for CRVFs that helped all the editors be on the same page. With the extra complexity in this year's club, I noticed that this simple text file checklist was getting cramped. I reached out to Roxy for some advice on how to organize it and he shared some insight which led us to make this proper checklist.
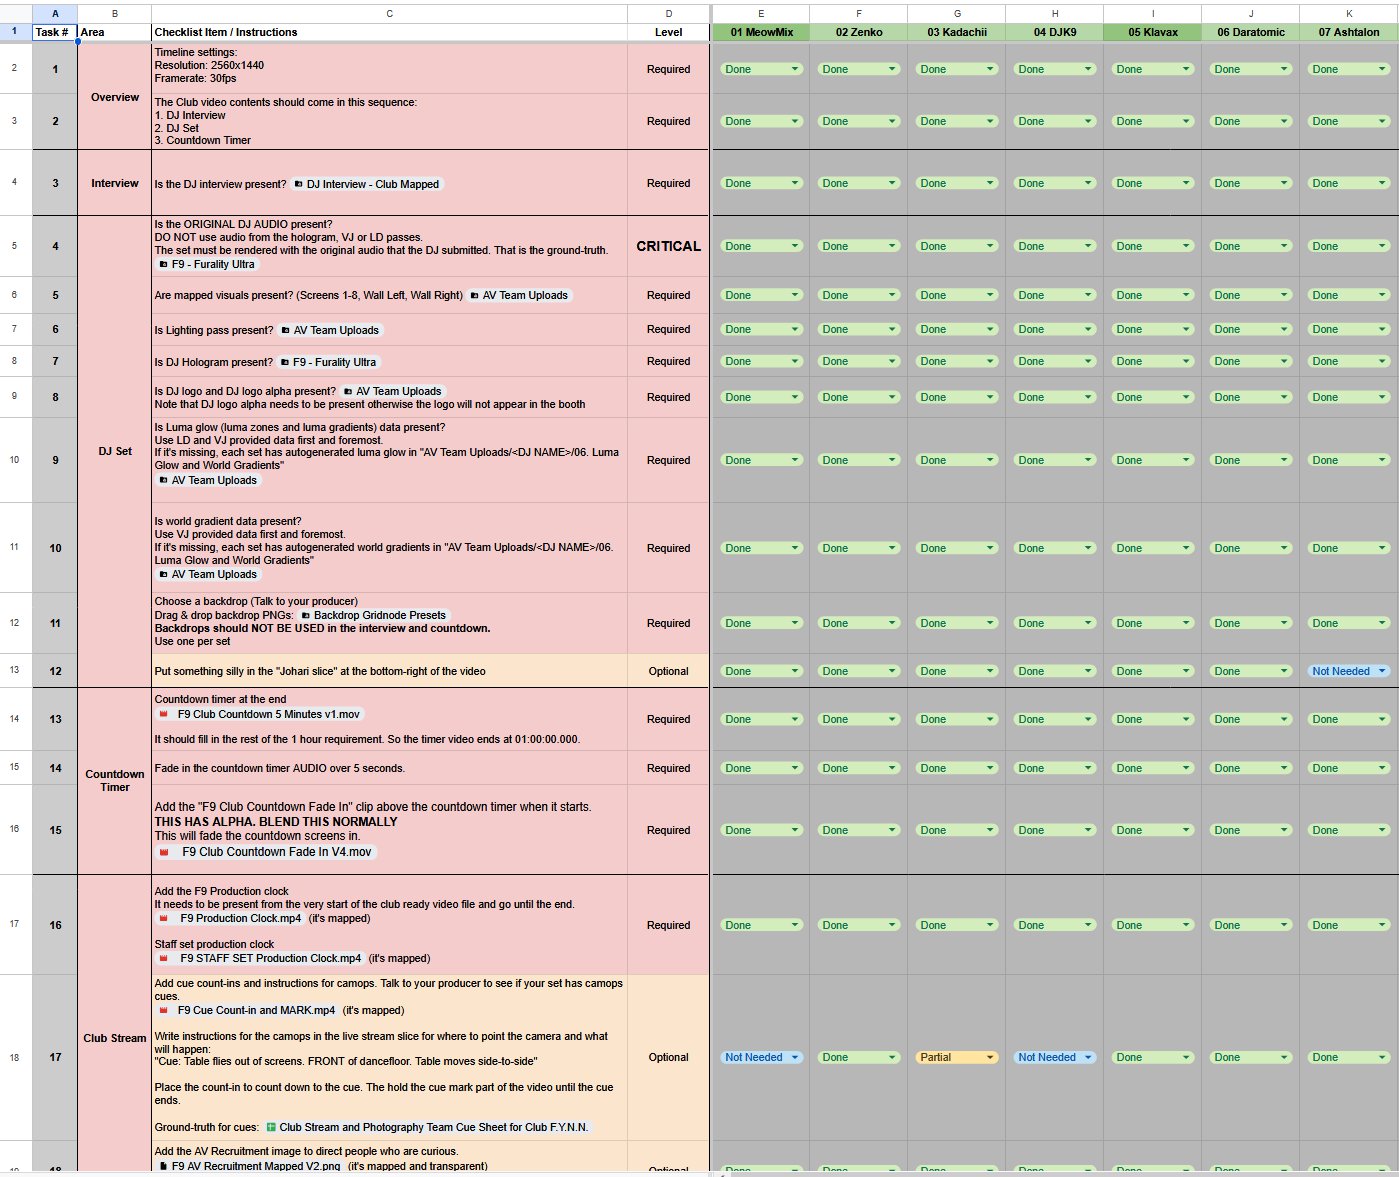
Each checklist item has an associated resource linked to it so you can always find the resource you need to check that item off.
This ended up being very useful and is one of the reasons why we were on top of things. It let us have the confidence we're not missing anything and let editors get up to speed really quickly on what needed to be in the CRVF.
Being a producer
This year I was producing:
- Kadachii
- Daratomic
- Daxan
- BirdBrain
Each one of the DJs gets a pod of producer, VJ (visuals), LD (lighting) and editor. The VJ does the visuals. The LD does the lights. The editor composites content.
The producer acts as the project manager and facilitator for all the work between the DJ and the pod.
So the general process I for me as a producer this year looked like this:
-
Establish communication with the DJs.
-
Set up crabfits with DJs at the start to kick off production.
-
Have the production kickoff meeting. Talk about:
- Production: How involved do you want to be with the production pipeline?
- Creative: What's the 'theme' of the set?
- Creative: Are there any specific moments in the set that you'd like us to do something special for, or to focus on?
- Misc: Anything to NOT do
- Club: does the DJ need club clearance?
-
Clear DJs for club access if needed.
-
Set up a second meeting to go through the set to figure out vis, lights, vis/light focus, any key points, notes etc and fill out the production tracking sheet.
-
Production is kicked off.
- Check in with LD/VJ to see if they have everything they need, if they're blocked or waiting or something. Also ask how they're feeling about the workload.
- Put in my own work on working on key points, anything specific to the production that I need to do etc.
- Share videos/pics with the DJ on any developments, updates to the rig.
-
Schedule preview sessions once all the VJ and LD content is in and we have drafts.
- Take notes during these sessions for what needs to be fixed.
-
QA the final drafts, ask for fixes if needed.
-
Sign off on the final CRVF (club ready video file).
For my productions, we aim for an asynchronous workflow where we coordinate once very extensively and then work on our own parts individually. Our teammates are located all around the world with different schedules and timezones, so constantly being in sync is not that easy. On top of that, everyone is working on multiple different projects with their own sync requirements.
So the production sheet is the way we manage all this work. We lay out the ideas and things we want to keep track of so we're all on the same page and assign work in the sheets.
Here's a page out of the Daxan production sheet.

This one took us around 8 hours spread across 4 meetings to fill out and properly understand. We're listening through the set during each meeting and trying to very clearly define the ideas that we're having, if we want to do them and how to precisely execute them.
Being an editor
I ended up being an editor for a few sets this year:
- Ashtalon
- What the PUP!
Being an editor involves taking various pieces of content and putting them all together. This year we were putting together:
- Credits
- Production clock
- "Johari" slice and A/V recruitment propaganda
- DJ hologram
- Luma glow + world gradients
- World backdrop DMX
- LD passes
- VJ Passes
- DJ logo
- DJ Audio
- Interview
- Countdown
We put all this stuff into a single timeline, sync it up with the audio, go through a checklist and render it out with a preset to create what we call a "club ready video file".
Here's What the PUP!'s timeline:
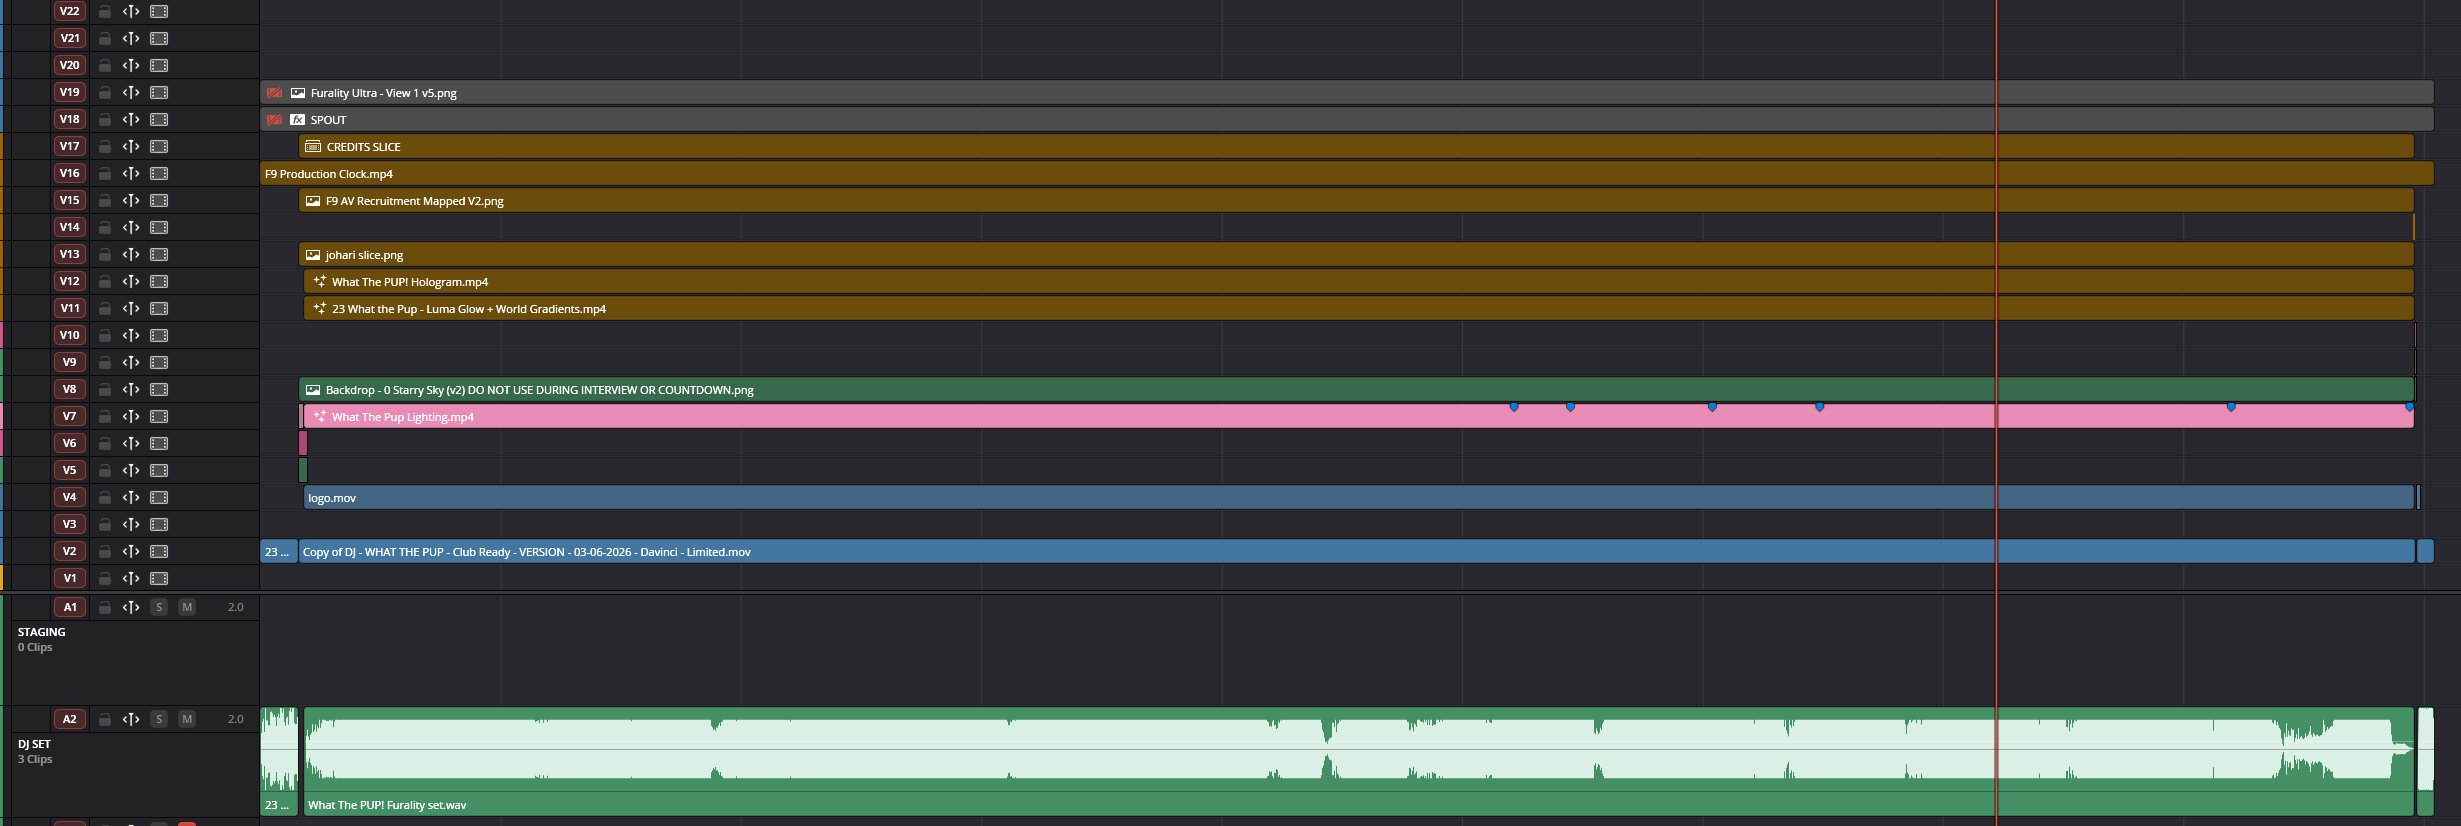
I'd consider this one to be one of the simpler ones as the VJ and LD have set me up for success. Every DJ set ends up having its own unique editor timeline given the content that's coming in and the workflow that the production team is using and how fancy the editor wants to make it.
Here's the timeline for Ashtalon.
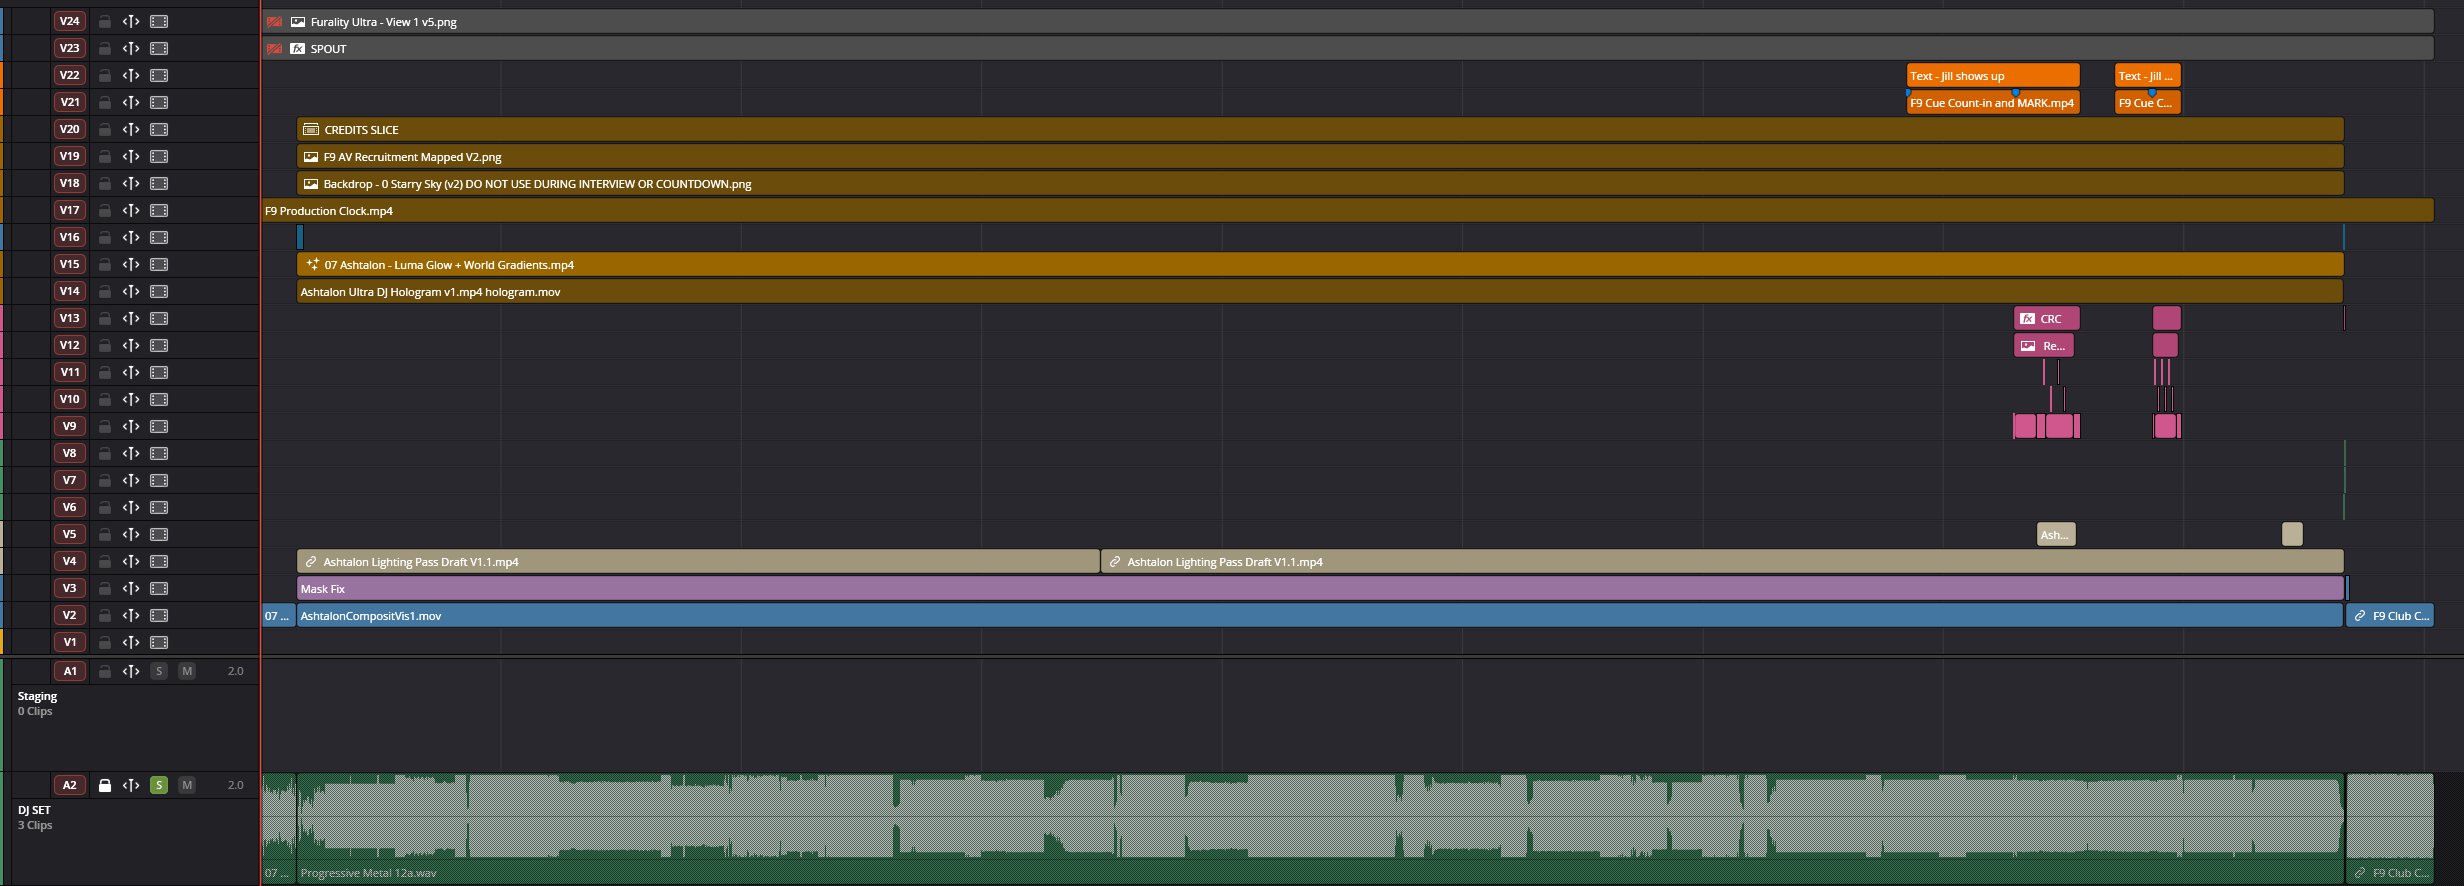
We decided to program in Jill last minute, I had to fix a slight bug with the VJ content spilling over into another screen and I added in fade-ins to the content at the beginning and end. The LD also had a hiccup during recording that we communicated on and had to fix. They also did a second pass on a few of the parts at the end. So a bit more going on here.
And then if you're like me and like to be a producer and editor for some sets, you get monsters like Daxan and Birdbrain.
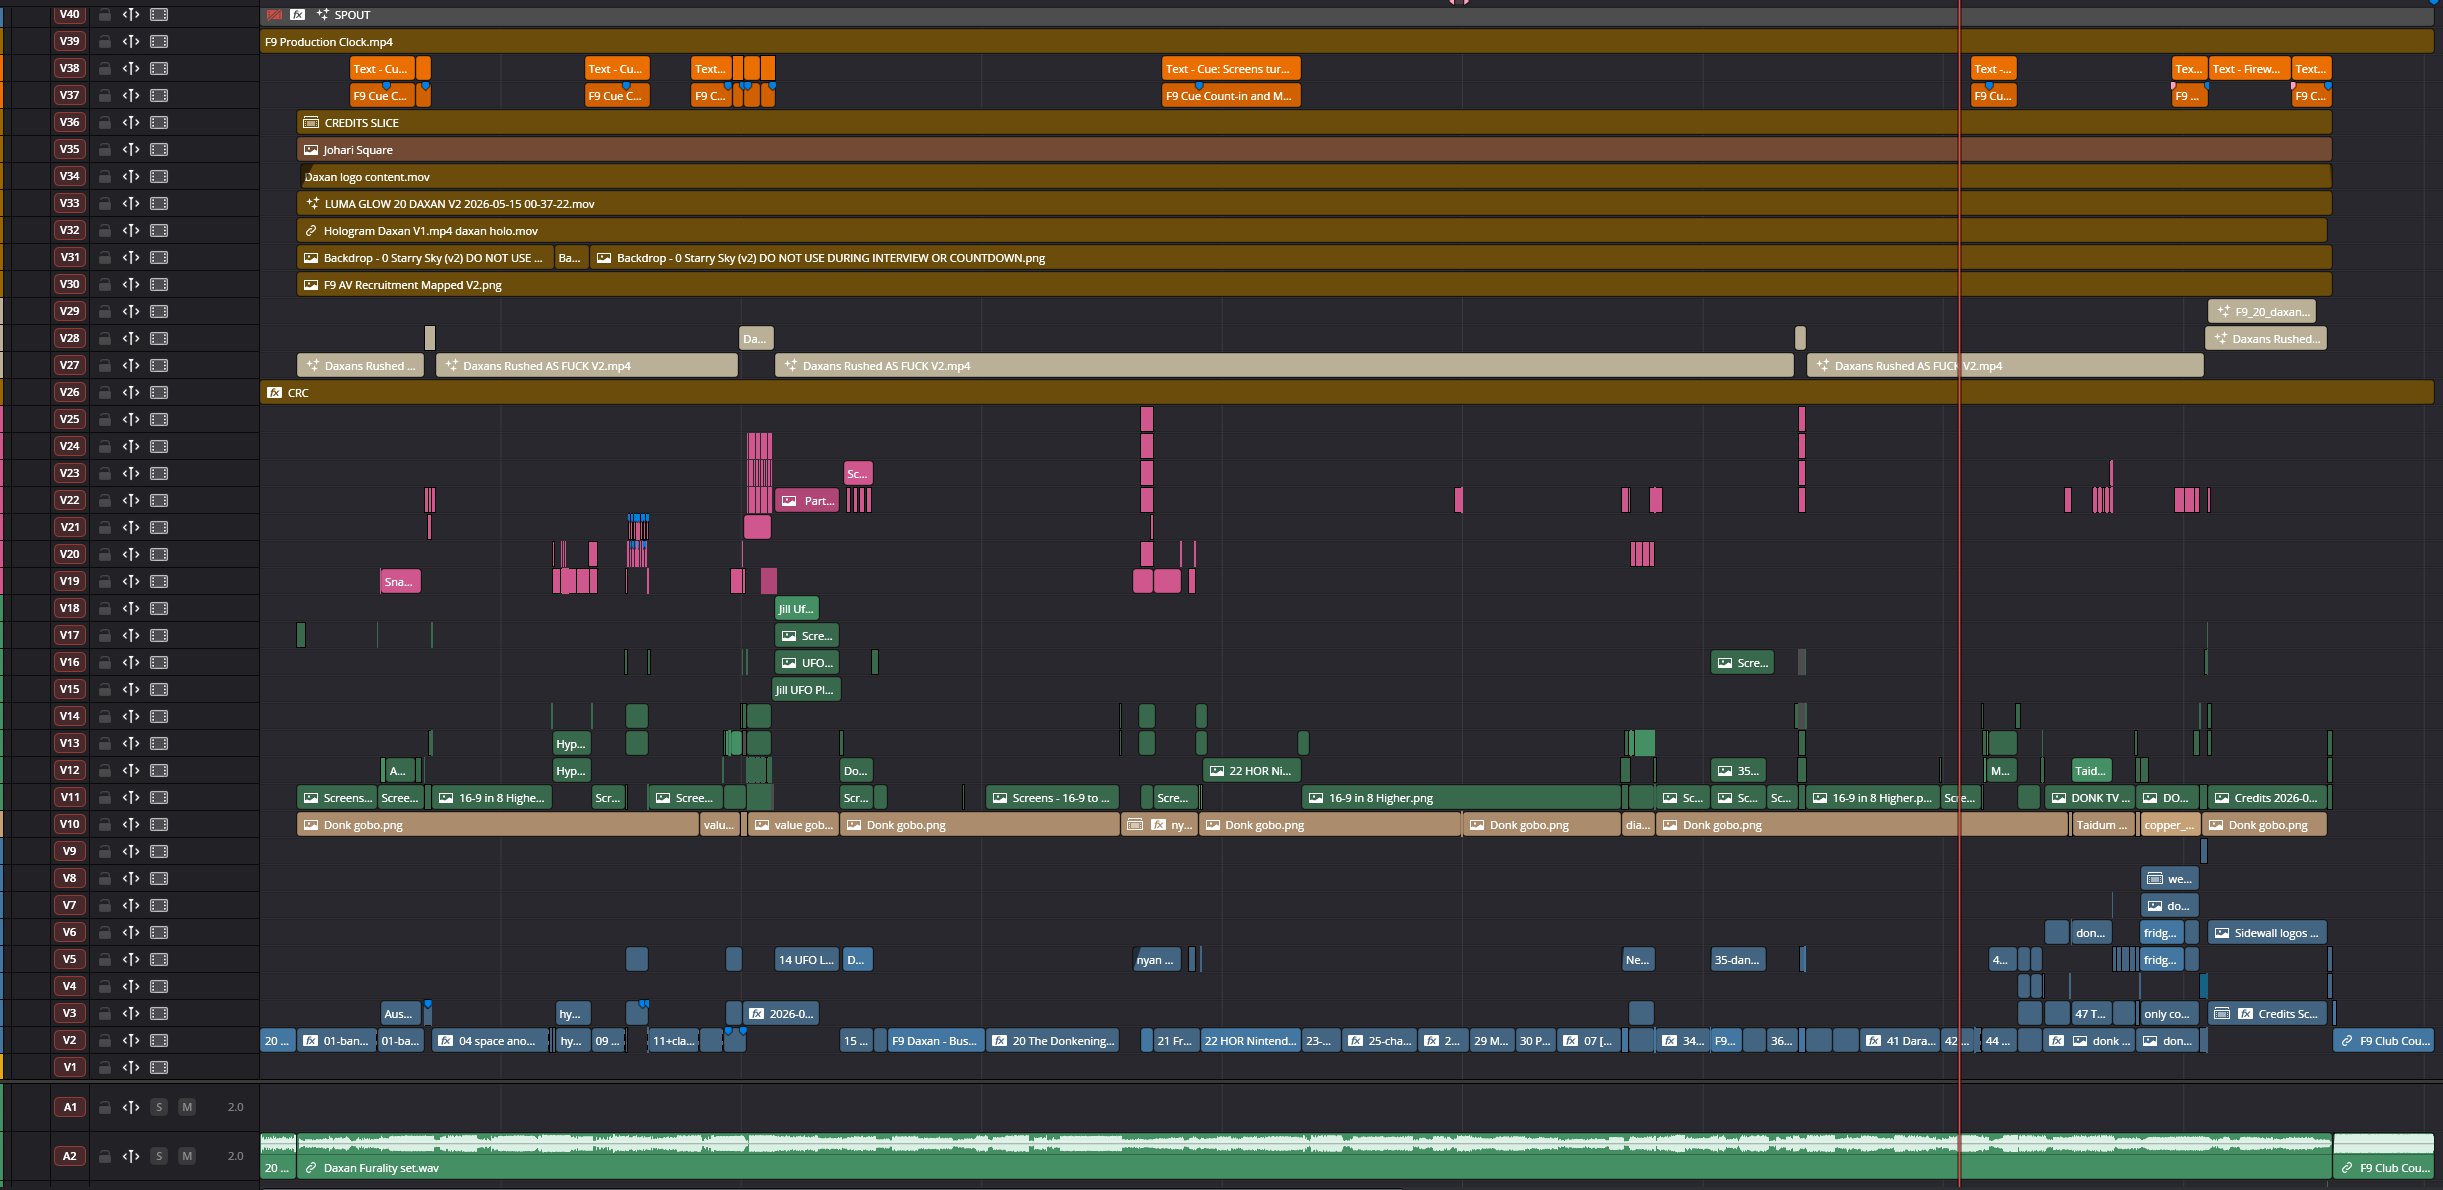
The clips are color coded:
- Blue - 16:9 content
- Tan - gobo
- Green - static gridnode data
- Purple - MDMX Fixture programming
- White - LD pass
- Brown - "place and forget" content.
For Daxan, I received unmapped 16:9 that I used VideoRemap to map out. A lot of the DMX programming and timecode sequencing happened in the timeline as well, hence the large amount of green and purple clips.
Birdbrain:
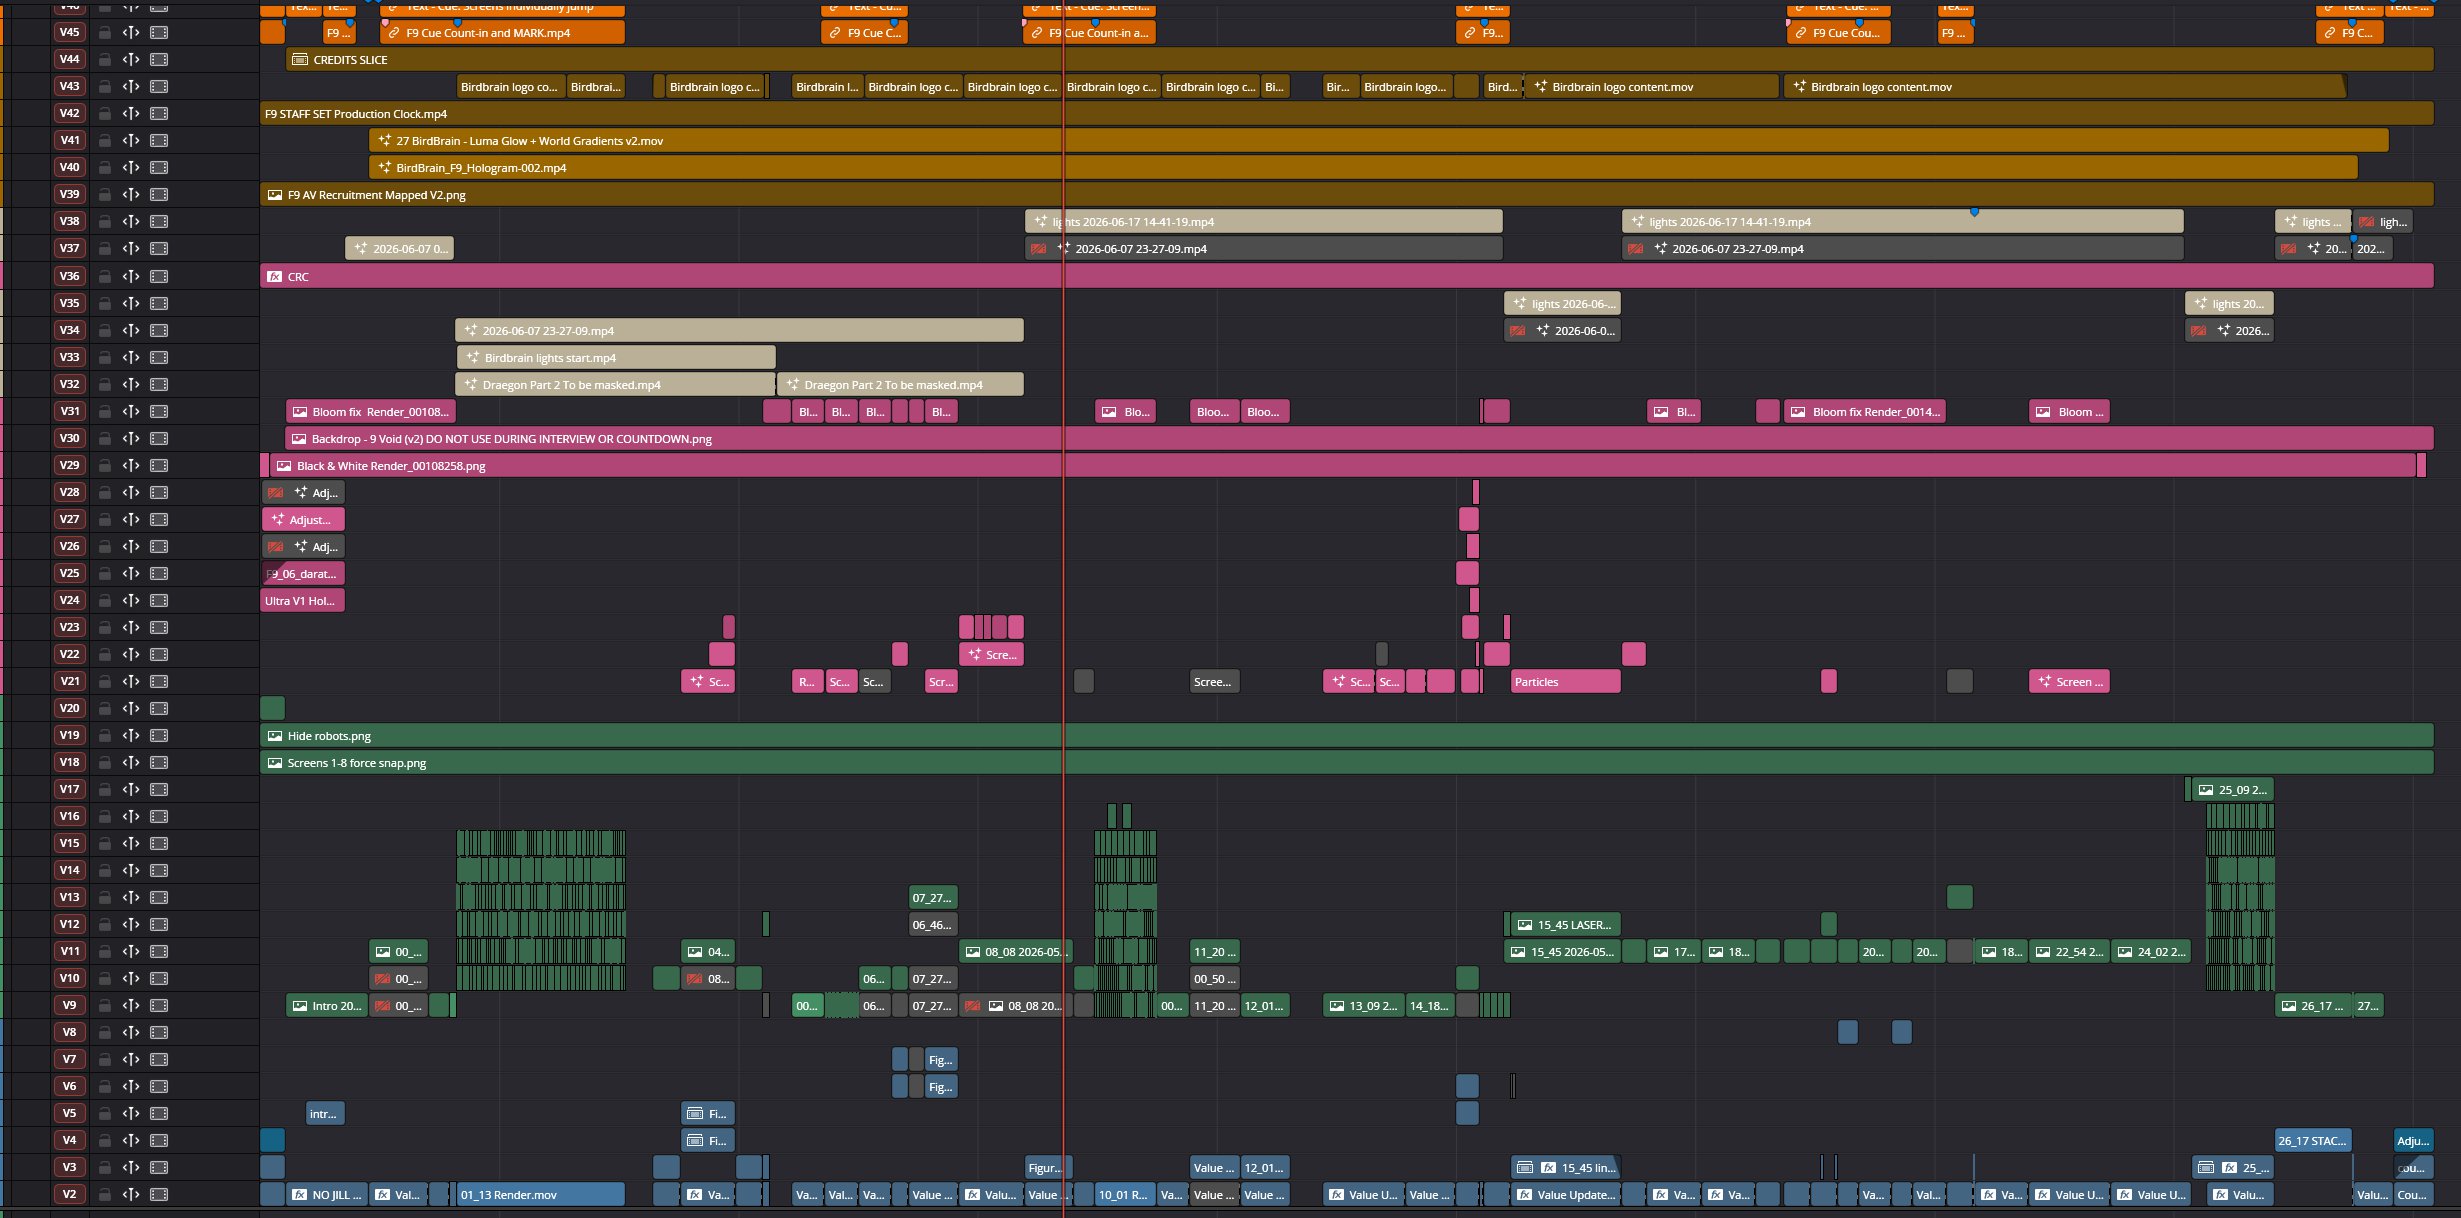
Birdbrain also provided 16:9 that I mapped with VideoRemap. A lot of the scenes were static so I was able to take screenshots of the screen DMX gridnode and sequence them in, hence all the green clips.
The reason why Birdbrain and Daxan's timelines are so complicated is because as the producer and editor I have the ability to easily control the whole club and I do not have to coordinate with the VJ and LD. Both of the DJs provided their own footage so my role as producer and editor was more of a "stage movement" designer in which I control how the visuals show up and what they do. The timeline was my way of expressing these stage motions.
QA
This year we had enough time to do proper QA passes on each set. We're still figuring out exactly what this process will look like, but this is one of the reasons why we were so on top of the production this year and why there were minimal issues once the club was up and running.
Once a CRVF draft was submitted, we either did a QA pass on it or put out a request for someone to do a QA pass on it. QAing a set meant streaming the set into the world and watching it in the world, taking notes of any things that look weird, feel missing or are outright incorrect. We then posted these issues in the production channel for that set and had that set's decision makers decide on how to fix or not fix them.
Putting out Fires
The production cycle wasn't perfect. Some things fell through the cracks, especially on a rig this complicated. I jumped on to fix issues with sets found 16-8 hours before that set is supposed to air. This usually required me to download the CRVF draft so far, and fix issues outlined in the QA passes.
So this means that some of the sets had some generational loss as the hotfix process required us to render over an existing CRVF draft, encoding it again. We got lucky and didn't notice any perceptive generational loss in this process in the visuals or gridnode data.
Sets I ended up hot fixing:
- Hotfixing for Zenko
- Hotfixing for DJK9
- Hotfixing for EKKO
A few of us ended up doing this hotfix process and it turned out great.
Individual Projects
Some interesting stories and things I did during the individual productions.
Screen Presets
I ended up making a bunch of screen presets for the team to use. It was unreasonable to expect everyone to make custom screen layouts so I had set aside a few days to make a package that contains Resolume mappings, gridnode screenshots and the blend file for a bunch of various screen presets that the team could drag and drop into their projects.
Daratomic
Dara's a good friend of mine and as much as I don't like hardstyle I still ended up working with him on the set. Dara, Raeschen, Pammematth and All Night were wonderfull to work with. Hitting the emotion during the intro and ending visuals programming was especially important and spent a good few days making sure we hit that right.
I'm selfisly happy that we got to reveal Jill with this set. How Raeschen programmed Jill during the laser moment ended up inspiring me to do better with how I had initially programmed Jill in Daxan's set and that ended up giving us the UFO vs Jill fight as we saw it during the convention.
Daxan
Daxan's set was crazy there's like 87 entries in the credits table for that set. Daxan and Tea++ took up the work of being external co-producers and organized all of the work that went into making the 16:9 "movie" content. I worked with them to figure out how to present it in the club and then do all the big stage movements you see like the table, Jill vs UFO fighting, the DONK TV etc.
Big ups to that whole team for being as crazy as they are with what they were trying to do. Matching that energy forced me to think creatively with the rig and do weird and funny things with it.
Thanks to Kat Food for jumping in last minute to help us out with lights.
Also got a chance to play with TD some more and make an audio-reactive DJ booth for the set :D
BirdBrain
BirdBrain has a special handover from the set before it [NBN] where that set's countdown doesn't fade out. We hard cut from that set into BirdBrain. So we had to coordinate on that and make some special countdown material to make that happen and it worked out pretty well.
I ended up doing something silly with MDMX CRC recalc. I took Daratomic's binary gridnode and distorted it and ran it through the CRC recalc to create the lighting that you see in the beginning of the set. It's all messed up and the lights are going everywhere but that's intended as it fits the theme of the set.
Fireworks
The fireworks team needed some help getting the final composite of the showfile ready. They sent me the individual clips and walked me through the show's cues and I put them all into a timeline and rendered them out.
The fireworks showfile was going to be delivered via HTTP on a CDN. So the thing I was rendering out was going to be played on everyones machines. And so, we had to render out in H.264 as that's the codec that we're guaranteed to have on all platforms. This meant using Davinci Native H.264 to render gridnode only video file.
The results were catastrophically bad.
The fireworks show video is all gridnode, most of it taken up by drones. Once the drones started moving, the H.264 native encoder completely gave up and had intra-frame smearing. On higher CBR bitrates it ended up being better, at the cost of a large video file. I'm not sure exactly what encoder "Native" is, but its seems like on windows it would be the WMF H.264 encoder
I know from experience that NVIDIA's encoder would also not be great as it has psycho-visual tuning and is optimized for real time encoding as opposed to mathematical accuracy. So that was off the table.
Something came to mind: what if we render out a ProRes 422 file and then transcode it to H.264 with VideoLAN x264 using Ffmpeg?
A few hours later we had a 213Mb H.264 show file with MINIMAL gridnode CRC decode errors.
This is the FFmpeg command line I ended up using to transcode:
ffmpeg -i "Fireworks ProRes 422 Master V1.mov" -pix_fmt yuv420p -c:v libx264 -tune animation -profile:v high -preset slower -crf 23 -c:a copy "Fireworks x264 Master V1.mp4"
- yuv420p to force a limited video color format to save on space.
- Animation because idfk that's what was in my head at the time.
- CRF 23 seemed to be okay (and turns out 20-23 is a good sweet spot for gridnode only data when measuring file size and CRC error)
- Profile high as all platforms we're targeting support it.
- Preset slower since we had the time to sit there a bit longer for a higher quality file.
After a bit of digging I found that there's an encoder pack that lets you use FFmpeg in Davinci We trialed it after the convention and found that for CRVFs it's about 3x slower but it still has good quality. It seems to break AV1 encoding on my machine though. This is a tad slow for us and I'd personally only use it if I had to encode more gridnode only content and not CRVFs that have a mixture of gridnode and visual content.
Closing
If you're interested in this kind of stuff, I encourage you to go get involved in helping run your favourite venue. Whether it's VR or at an IRL convention, talk to the people running the show and see if you can help out! While this kind of stuff is a lot of work, it's a space with an incredible amount of technical and creative overlap. If you're the kind of person searching for that, try it out!